How to Use Global Variables in Form Personalization?


Here let’s say the requirement is to run a concurrent program through a custom menu from an oracle form and in that concurrent program parameters, we need to fetch some values from the oracle form itself. In that case we need to first assign the form values to some Global Variables and then use them in the concurrent program parameters. Here are the Steps:

1] Go to Form Personalization for that Form (Use: Help > Diagnostics > Custom Code > Personalize)

2] Create one custom menu (ex. SPECIAL15) on the triggering event: WHEN-NEW-FORM-INSTANCE.

3] On the triggering event: SPECIAL15, do the following actions:

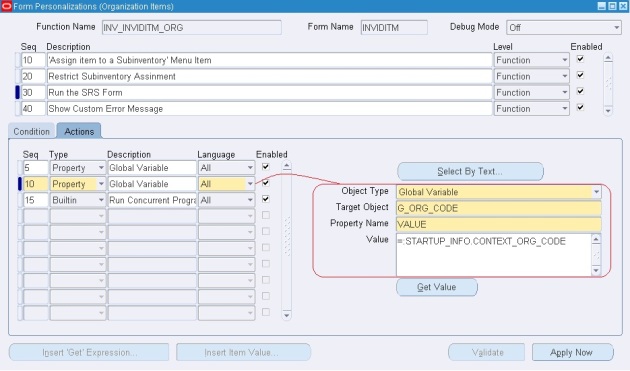
  • Select Type as ‘Property’ and select Object Type as ‘Global Variable’.
  • Give a name to the global variable in the ‘Target Object’ tab. (Ex. G_ITEM_NAME, G_ORG_CODE)
  • Select the Property Name as ‘VALUE’.
  • In the value tab- Give ‘=:Block_name.Field_name’ (Use: Help > Diagnostics > Examine). This is the value which you want to put in the global variable.

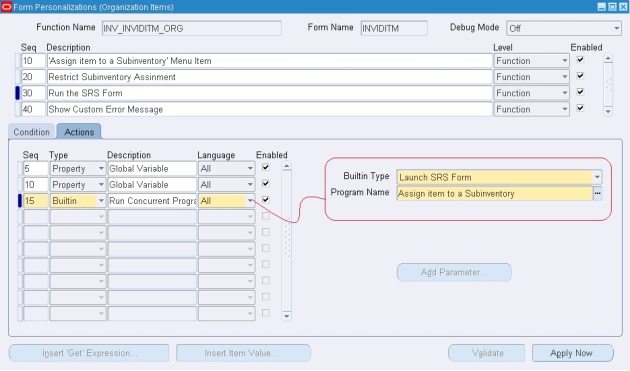
4] Select Type as ‘Builtin’ and Select Builtin Type as ‘Launch SRS Form’.

5] Select your Concurrent Program in the ‘Program Name’ tab. Please note that you need to assign the Function – ‘Requests: Submit’ to the Main Menu of the responsibility to which your concurrent program is attached.

  • Use: System Administrator > Security > Responsibility > Define to find the Menu Name.
  • Go to System Administrator > Application > Menu and add the Function – ‘Requests: Submit’ at the end and Save.
  • Also don’t forget to attach the concurrent program to proper Request Group.

6] Go to the concurrent program parameters. Select the Default Type as SQL Statement in the Validation tab and give the default values as

  • select :GLOBAL.G_ITEM_NAME from dual
  • select :GLOBAL.G_ORG_CODE from dual

7] Save and Test the functionality.

An Alternate Way:

Create a PL/SQL function in the database that calls fnd_request.submit_request and commits in an AUTONOMOUS TRANSACTION. The function returns a message to the user, with the request_id.

1] Go to Form Personalization for that Form (Use: Help > Diagnostics > Custom Code > Personalize)

2] Create one custom menu (ex. SPECIAL15) on the triggering event: WHEN-NEW-FORM-INSTANCE.

3] On the triggering event: SPECIAL15, do the following actions:

  • Define a global variable for the message (Ex. XX_CONC_PROG_RESULT)
  • Assign the above global variable the following value: =SELECT <Your Custom PL/SQL Function> from dual. You can pass parameters to the function as: Block_name.Field_name.
  • Define a message to show as =:GLOBAL.XX_CONC_PROG_RESULT

How to call a Concurrent Program from a Special Menu Item?


Well, we can run our concurrent programs from a Special Menu Item, and if you have a requirement of this sort, you can use the steps below to use Form Personalization Builtin to achieve this task in couple of minutes.

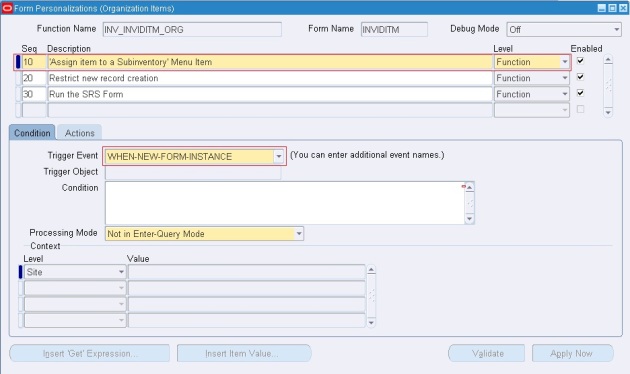
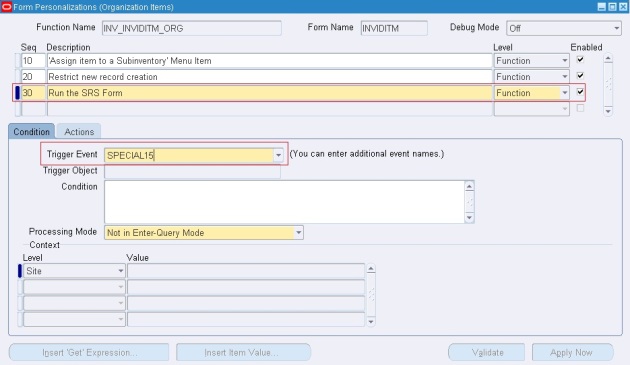
1] First create the Special Menu Item wherever required through Form Personalization. Here I have added a Special Menu Item called ‘Assign Item to a Subinventory’ to the Form-‘INVIDITM’. For that assign the Trigger Event as ‘WHEN-NEW-FORM-INSTANCE’.

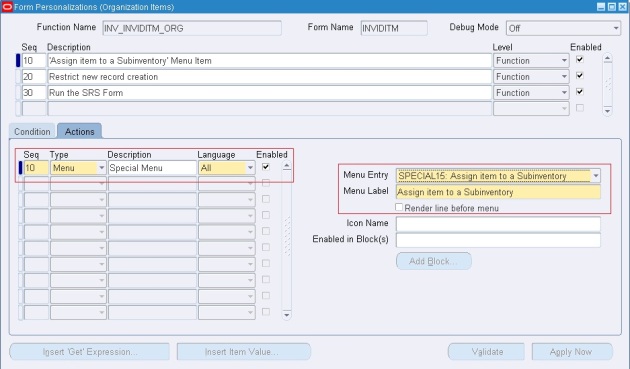
2] In Actions Tab, choose the type as ‘MENU’ and select the Menu Entry and give a Proper Menu Label.

3] Create the Concurrent Program which you want to attach to this custom menu item. Once created, assign the program to the Request Group of the Responsibility. Also it is required to add the ‘Lunch SRS Form’ Function (Requests: Submit) to the main menu of that responsibility. If you don’t do this step you may get Form Personalization error in later steps.

4] Create one more entry in Form Personalization window with Trigger Event as your custom menu item.

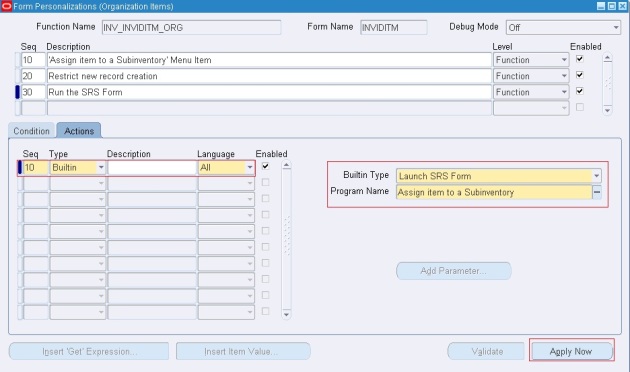
5] Here select the Actions Type as ‘Builtin’ and Builtin Type as ‘Lunch SRS Form’. In the program name give the name of your concurrent program.

6] Validate and Apply Now

Once done, you will be able to view the custom menu item in the Form and when you will click it, it opens the SRS Form with your concurrent program.

Form Personalization, Call a Function, And Return Value To Screen?


In from personalization it is possible to call a database function that retrieves values based on other data entered on the screen by the user. The function then returns these values to a field on the screen. We can use a SELECT statement to call the function, put the data entered by user in some fields as required parameters to the function and finally assign the value returned by the function to a field in the form.

Before doing the exercise, please note the below points:

1] Every property that takes a string can either be processed literally or evaluated at runtime.

2] If you type a string in that does not start with ‘=’, then the exact value you type in will be used at runtime.

3] If the string you type starts with ‘=’, then the text immediately after that character will be evaluated at runtime. This allows you to write complex logic that can include references such as:

  • SQL operators, such as ||, TO_CHAR, DECODE, and NVL
  • Bind variables (:block.field), including: system: global and: parameter values. Use the ‘Add Item…’ button to assist with item names.
  • Calls to server-side functions that do not have OUT parameters.

4] To use SELECT statement, you must follow these rules:

  • The text must start with ‘=SELECT’
  • The column being selected must evaluate to a CHAR, with a length no longer than 2000 bytes.
  • Your SELECT statement should only return one row, but if more than one is returned only the value of the first row will be used.

Here is a simple example using a function in the database that queries values, then a personalization that sets the value queried. This example is defined in the miscellaneous transactions form (INVTTMTX.fmb) and passes the Project Information (Project Number, Task Number, Expenditure Type and Expenditure Org) to the function.

=select xx_getaccount_pkg.main(''||${item.MTL_TRX_LINE.ITEM.value}||'',
''||${item.MTL_TRX_LINE.SOURCE_PROJECT_NUMBER.value}||'',
''||${item.MTL_TRX_LINE.SOURCE_TASK_NUMBER.value}||'',
''||${item.MTL_TRX_LINE.EXPENDITURE_TYPE.value}||'',
''||${item.MTL_TRX_LINE.EXPENDITURE_ORG.value}||'') from dual

Note that the variable in this case is written as “${item.MTL_TRX_LINE.ITEM.value}”. The text “MTL_TRX_LINE.ITEM.” is the Block and Field where the item number is written. The syntax around the block and field name ensures that the callout is made to replace the value of the item before passing the text to the function. You can use similar naming for your own fields finding the name of the Block and Field using Help > Diagnostics > Examine. Also don’t put semicolon (;) after the statement.

Open the form that you want to personalize, then choose Help > Diagnostics > Custom Code > Personalize. In this case, the miscellaneous transactions form is opened.

Enter the main information about when this personalization will be active.

Use the ‘Validate’ button to test if the syntax of your string is valid. If the evaluation fails, the processing engine will return an ORA error as if the string had been part of a SQL expression. Otherwise, it will display the text exactly as it would appear at runtime in the current context.

Enter the action information detailing what the personalization will do. Here select the ‘Property Name’ as VALUE and then put the above sql statement.

Save the changes and test the personalization.

In this case, the Project Information (Project Number, Task Number, Expenditure Type and Expenditure Org) is passed from the screen to the database function. The function then derives the GL Account from the above parameters. The value is then replaced for the Account field on the screen.

Moving Form Personalizations Between Instances


Once you create and test personalizations in your test instance, you can move them to production instances. Personalizations can be extracted by the loader on a per-function basis or per-form basis (that is, each loader file will contain all of the personalizations for a single function or form, respectively). Note that upon uploading, all prior personalizations for that function are first deleted, and then the contents of the loader file are inserted.

The loader syntax is as follows:

To download rules for a particular function:

FNDLOAD / 0 Y DOWNLOAD $FND_TOP/patch/115/import/affrmcus.lct FND_FORM_CUSTOM_RULES function_name=

Note: this style is not recommended, as the personalizations that affect a particular function can now be a mix of function- and form-level rules.

To download rules for a particular form:

FNDLOAD/ 0 Y DOWNLOAD $FND_TOP/patch/115/import/affrmcus.lctFND_FORM_CUSTOM_RULES form_name=

To download all personalizations (all forms and functions):

FNDLOAD / 0 Y DOWNLOAD $FND_TOP/patch/115/import/affrmcus.lct FND_FORM_CUSTOM_RULES

Upload:

FNDLOAD / 0 Y UPLOAD $FND_TOP/patch/115/import/affrmcus.lct