Deploying OAF Personalizations Using the Import/Export Command Line Tools


After personalizing and testing framework pages in a Development instance, you may wish to automate the transfer of these changes to another instance, rather than manually re-doing them all again. This objective can be achieved by exporting the personalizations from the Development instance, then importing them to a different instance or instances

You can either use the GUI interface in “Functional Administrator” (Personalization tab) to transfer personalizations, or can invoke the XMLImporter/XMLExporter commands directly from the command line. The Export tool allows you to export a package or xml file (along with translation information) from the MDS repository of a database instance to a .xml file (or .xlf file for translations). The command line Export tool is necessary if you wish to perform bulk translations of personalization documents.

This post provides the below detailed steps how to transfer personalizations from one instance to others using the XMLImporter/XMLExporter tool.

1. Get Document Name

Go to the page you want to copy the personalization from and click the “about this Page” link at the bottom of the page. You will see the page name with full path which starts with /oracle/apps/<prod>.

Ex: /oracle/apps/icx/por/wf/webui/ReqLinesNotificationsRN

2. Get the Personalization Document info

Run the following command in TOAD or other tools as APPS user   

set serveroutput on
exec jdr_utils.listCustomizations('<full document name from step 1>');

Example:

set serveroutput on
exec jdr_utils.listCustomizations('/oracle/apps/icx/por/wf/webui/ReqLinesNotificationsRN');

Output:

anonymous block completed

/oracle/apps/icx/por/wf/webui/customizations/site/0/ReqLinesNotificationsRN

Note: If there are multiple records returned by this command, you will need to use export/import each item individually that you wish to export. You may also find there are records returned for seeded personalizations provided by Oracle which do not need to be exported.

3. Use XMLExporter to export personalization document

java oracle.jrad.tools.xml.exporter.XMLExporter <personalization document from step #2>  \
-username "<username>" -password "<password>"  \
-dbconnection "(description=(address_list=(address=(protocol=tcp)(host=<host>)(port=<port)))(connect_data=(sid=<sid>)))" \
-rootdir "<output directory>"

Example:

java oracle.jrad.tools.xml.exporter.XMLExporter \
/oracle/apps/icx/por/wf/webui/customizations/site/0/ReqLinesNotificationsRN -username apps -password w3lcome123 \
-dbconnection "(description=(address_list=(address=(protocol=tcp)(host=myhost)(port=12345)))(connect_data=(sid=dev)))" -rootdir "$XXSCM_TOP/install" \

Here one file named ReqLinesNotificationsRN.xml will be created in the below path:
XXSCM_TOP/install/oracle/apps/icx/por/wf/webui/customizations/site/0. Open the file and you will able to view the personalizations that you have done.

4. Use XMLImporter to import personalization document

Run the below command in the Instance where you want to import your personalization.

java oracle.jrad.tools.xml.importer.XMLImporter \
<full path of the file you want to import> \
-username "<username>" -password "<password>"  \
-dbconnection "(description=(address_list=(address=(protocol=tcp)(host=<host>)(port=<port>)))(connect_data=(sid=<sid>)))" -rootdir "<top level directory>" \
-rootPackage "/oracle/apps/<prod>"

Example:

java oracle.jrad.tools.xml.importer.XMLImporter \
$XXSCM_TOP/install/ReqLinesNotificationsRN.xml \
-username apps -password w3lcome123 \
-dbconnection "(description=(address_list=(address=(protocol=tcp)(host= myhost)(port=12345)))(connect_data=(sid=dev)))" -rootdir "$XXSCM_TOP/install" \
-rootPackage "oracle/apps/icx/por/wf/server"
Utility APIs for Concurrent Processing


FND_CONCURRENT.GET_REQUEST_STATUS

This API Returns the Status of a concurrent request. It also returns the completion text if the request is already completed. The return type is Boolean (Returns TRUE on successful retrieval of the information, FALSE otherwise).

  function get_request_status(request_id     IN OUT NOCOPY number,
		              appl_shortname IN varchar2 default NULL,
		              program        IN varchar2 default NULL,
		              phase      OUT NOCOPY varchar2,
		              status     OUT NOCOPY varchar2,
		              dev_phase  OUT NOCOPY varchar2,
		              dev_status OUT NOCOPY varchar2,
		              message    OUT NOCOPY varchar2) return boolean;

The parameters are:

  • REQUEST_ID: Request ID of the program to be checked.
  • APPL_SHORTNAME: Short name of the application associated with the program. The default is NULL.
  • PROGRAM: Short name of the concurrent program. The default is NULL.
  • PHASE: Request phase.
  • STATUS: Request status.
  • DEV_PHASE: Request phase as a string constant.
  • DEV_STATUS: Request status as a string constant.
  • MESSAGE: Request completion message.

FND_CONCURRENT.WAIT_FOR_REQUEST

This API waits for the request completion, then returns the request phase/status and completion message to the caller. It goes to sleep between checks for the request completion. The return type is Boolean (Returns TRUE on successful retrieval of the information, FALSE otherwise).

  function wait_for_request(request_id IN number default NULL,
		  interval   IN  number default 60,
		  max_wait   IN  number default 0,
		  phase      OUT NOCOPY varchar2,
		  status     OUT NOCOPY varchar2,
		  dev_phase  OUT NOCOPY varchar2,
		  dev_status OUT NOCOPY varchar2,
		  message    OUT NOCOPY varchar2) return  boolean;

The parameters are:

  • REQUEST_ID: Request ID of the request to wait on. The default is NULL.
  • INTERVAL: Number of seconds to wait between checks. The default is 60 seconds.
  • MAX_WAIT: Maximum number of seconds to wait for the request completion. The default is 00 seconds.
  • PHASE: User-friendly Request phase.
  • STATUS: User-friendly Request status.
  • DEV_PHASE: Request phase as a constant string.
  • DEV_STATUS: Request status as a constant string.
  • MESSAGE: Request completion message.
There are few other useful apis too.
  • FND_CONCURRENT.SET_COMPLETION_STATUS: Called from a concurrent request to set its completion status and message.
  • FND_CONCURRENT.GET_REQUEST_PRINT_OPTIONS: Returns the print options for a concurrent request.
  • FND_CONCURRENT.GET_SUB_REQUESTS: Get all sub-requests for a given request id. For each sub-request it provides request_id, phase,status, developer phase , developer status and completion text.
  • FND_CONCURRENT.Cancel_Request: It cancels a given Concurrent Request.

How to call a Concurrent Program from a Special Menu Item?


Well, we can run our concurrent programs from a Special Menu Item, and if you have a requirement of this sort, you can use the steps below to use Form Personalization Builtin to achieve this task in couple of minutes.

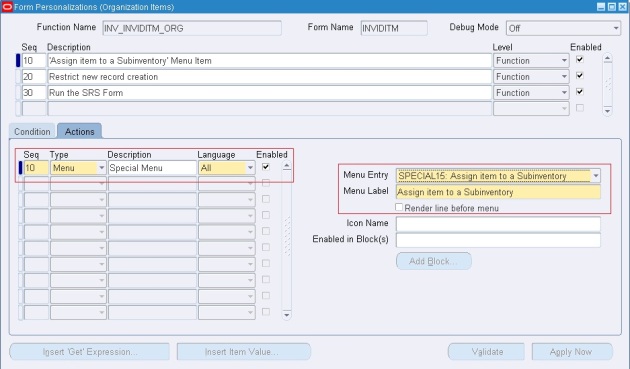
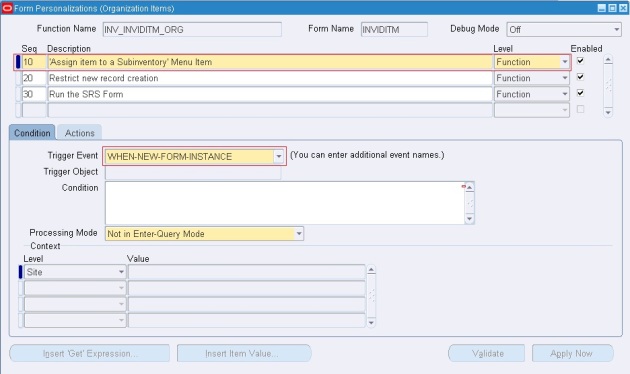
1] First create the Special Menu Item wherever required through Form Personalization. Here I have added a Special Menu Item called ‘Assign Item to a Subinventory’ to the Form-‘INVIDITM’. For that assign the Trigger Event as ‘WHEN-NEW-FORM-INSTANCE’.

2] In Actions Tab, choose the type as ‘MENU’ and select the Menu Entry and give a Proper Menu Label.

3] Create the Concurrent Program which you want to attach to this custom menu item. Once created, assign the program to the Request Group of the Responsibility. Also it is required to add the ‘Lunch SRS Form’ Function (Requests: Submit) to the main menu of that responsibility. If you don’t do this step you may get Form Personalization error in later steps.

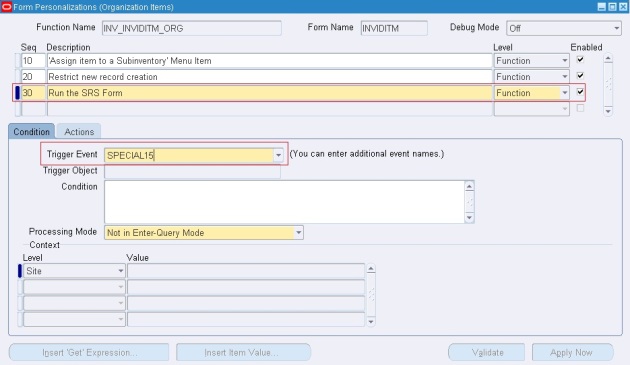
4] Create one more entry in Form Personalization window with Trigger Event as your custom menu item.

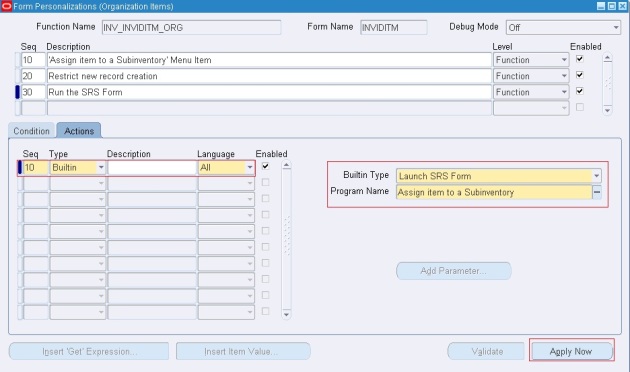
5] Here select the Actions Type as ‘Builtin’ and Builtin Type as ‘Lunch SRS Form’. In the program name give the name of your concurrent program.

6] Validate and Apply Now

Once done, you will be able to view the custom menu item in the Form and when you will click it, it opens the SRS Form with your concurrent program.

Query to find the Request Group of a Concurrent Program


Many a times we need to find out the Request Group of a Concurrent Program. In such cases the below query will be a useful one.

SELECT
  RG.APPLICATION_ID "Request Group Application ID",
  RG.REQUEST_GROUP_ID "Request Group - Group ID",
  RG.REQUEST_GROUP_NAME,
  RG.DESCRIPTION,
  rgu.unit_application_id,
  rgu.request_group_id "Request Group Unit - Group ID",
  rgu.request_unit_id,cp.concurrent_program_id,
  cp.concurrent_program_name,
  cpt.user_concurrent_program_name,
  DECODE(rgu.request_unit_type,'P','Program','S','Set',rgu.request_unit_type) "Unit Type"
FROM
  fnd_request_groups rg,
  fnd_request_group_units rgu,
  fnd_concurrent_programs cp,
  FND_CONCURRENT_PROGRAMS_TL CPT
WHERE rg.request_group_id = rgu.request_group_id
  AND rgu.request_unit_id = cp.concurrent_program_id
  AND cp.concurrent_program_id = cpt.concurrent_program_id
  AND cpt.user_concurrent_program_name =’<Your_Concurrent_Program_Name>’;

API to Assign Item to an Organization in Oracle Inventory


EGO_ITEM_PUB package provides functionality for maintaining items, item revisions, etc. We can use ASSIGN_ITEM_TO_ORG procedure to assign one item to an organization.

The procedure definition is:

  PROCEDURE Assign_Item_To_Org(
      p_api_version             IN      NUMBER
     ,p_init_msg_list           IN      VARCHAR2        DEFAULT  G_FALSE
     ,p_commit                  IN      VARCHAR2        DEFAULT  G_FALSE
     ,p_Inventory_Item_Id       IN      NUMBER          DEFAULT  G_MISS_NUM
     ,p_Item_Number             IN      VARCHAR2        DEFAULT  G_MISS_CHAR
     ,p_Organization_Id         IN      NUMBER          DEFAULT  G_MISS_NUM
     ,p_Organization_Code       IN      VARCHAR2        DEFAULT  G_MISS_CHAR
     ,p_Primary_Uom_Code        IN      VARCHAR2        DEFAULT  G_MISS_CHAR
     ,x_return_status           OUT NOCOPY  VARCHAR2
     ,x_msg_count               OUT NOCOPY  NUMBER);

The parameters are:

  • P_API_VERSION – A decimal number indicating major and minor revisions to the API. Pass 1.0 unless otherwise indicated in the API parameter list.
  • P_INIT_MSG_LIST – A one-character flag indicating whether to initialize the FND_MSG_PUB package’s message stack at the beginning of API processing (and thus remove any messages that may exist on the stack from prior processing in the same session). Valid values are FND_API.G_TRUE and FND_API.G_FALSE.
  • P_COMMIT – A one-character flag indicating whether to commit work at the end of API processing. Valid values are FND_API.G_TRUE and FND_API.G_FALSE.
  • P_INVENTORY_ITEM_ID – Inventory Item Id of the Item
  • P_ITEM_NUMBER – Segment1 of the Item
  • P_ORGANIZATION_ID – Organization Id of the Organization to whom Item must be assigned
  • P_ORGANIZATION_CODE – 3 character Organization Code of the Organization to whom Item must be assigned
  • P_PRIMARY_UOM_CODE – Primary Unit of Measure of the item.
  • X_RETURN_STATUS – A one-character code indicating whether any errors occurred during processing (in which case error messages will be present on the FND_MSG_PUB package’s message stack). Valid values are FND_API.G_RET_STS_SUCCESS, FND_API.G_RET_STS_ERROR, and FND_API.G_RET_STS_UNEXP_ERROR.
  • X_MSG_COUNT – An integer indicating the number of messages on the FND_MSG_PUB package’s message stack at the end of API processing.

Sample Code: (Tested in R12.1.3)

DECLARE
        g_user_id             fnd_user.user_id%TYPE :=NULL;
        l_appl_id             fnd_application.application_id%TYPE;
        l_resp_id             fnd_responsibility_tl.responsibility_id%TYPE;
        l_api_version		  NUMBER := 1.0;
        l_init_msg_list       VARCHAR2(2) := fnd_api.g_false;
        l_commit		      VARCHAR2(2) := FND_API.G_FALSE;
        x_message_list        error_handler.error_tbl_type;
        x_return_status		  VARCHAR2(2);
        x_msg_count		      NUMBER := 0;
BEGIN
        SELECT fa.application_id
          INTO l_appl_id
          FROM fnd_application fa
         WHERE fa.application_short_name = 'INV';

        SELECT fr.responsibility_id
          INTO l_resp_id
          FROM fnd_application fa, fnd_responsibility_tl fr
         WHERE fa.application_short_name = 'INV'
           AND fa.application_id = fr.application_id
           AND UPPER (fr.responsibility_name) = 'INVENTORY';

        fnd_global.apps_initialize (g_user_id, l_resp_id, l_appl_id);

        EGO_ITEM_PUB.ASSIGN_ITEM_TO_ORG(
                   P_API_VERSION          => l_api_version
                ,  P_INIT_MSG_LIST        => l_init_msg_list
                ,  P_COMMIT               => l_commit
                ,  P_INVENTORY_ITEM_ID    => 1003
                ,  p_item_number          => 000000000001035
                ,  p_organization_id      => 11047
                ,  P_ORGANIZATION_CODE    => 'DXN'
                ,  P_PRIMARY_UOM_CODE     => 'EA'
                ,  X_RETURN_STATUS        => x_return_status
                ,  X_MSG_COUNT            => x_msg_count
            );
        DBMS_OUTPUT.PUT_LINE('Status: '||x_return_status);
        IF (x_return_status <> FND_API.G_RET_STS_SUCCESS) THEN
          DBMS_OUTPUT.PUT_LINE('Error Messages :');
          Error_Handler.GET_MESSAGE_LIST(x_message_list=>x_message_list);
            FOR j IN 1..x_message_list.COUNT LOOP
              DBMS_OUTPUT.PUT_LINE(x_message_list(j).message_text);
            END LOOP;
        END IF;
EXCEPTION
        WHEN OTHERS THEN
          dbms_output.put_line('Exception Occured :');
          DBMS_OUTPUT.PUT_LINE(SQLCODE ||':'||SQLERRM);
END;

A Random Collection!


PL/SQL Wrap Utility and DBMS_DDL.WRAP Function to Encrypt your PL/SQL Code


Often developers want to wrap their code to prevent the misuse of their code and also sometimes they don’t want to expose their algorithm to the world. For such cases Oracle has come up with a utility called ‘wrap utility’ (wrap.exe) which provides a way for PL/SQL developers to protect their intellectual property by making their PL/SQL code unreadable. These encryption options have long been available for other programming languages and were introduced for PL/SQL in version 7.

The wrap utility takes a readable, ASCII text file as input and converts it to a file containing byte code.  The result is that the DBA, developers or anyone with database access cannot view the source code in any readable format.

How to run?

To run the Wrap Utility, enter the wrap command at your operating system prompt using the following syntax:

wrap iname=input_file [oname=output_file]

Where

  • iname – The name of the unencrypted PL/SQL file to be used as input (your source file).
  • oname – The name of the output file.  This file will be encrypted.

Note:

  • Leave no space around the equal signs because spaces delimit individual arguments.
  • The wrap command requires only one argument, which is iname=input_file where input_file is the name of the Wrap Utility input file. You need not specify the file extension because it defaults to sql.
  • However, you can specify a different file extension such as ‘wrap iname=/mydir/myfile.src’
  • Optionally, the wrap command takes a second argument, which is oname=output_file where output_file is the name of the Wrap Utility output file. You need not specify the output file because its name defaults to that of the input file and its extension defaults to plb (PL/SQL binary).
  • Generally, the output file is much larger than the input file.
  • The input file can contain any combination of SQL statements. However, the Wrap Utility encrypts only the CREATE statements, which define subprograms, packages, or object types.
  • If your input file contains syntax errors, the Wrap Utility detects and reports them. However, the Wrap Utility cannot detect semantic errors because it does not resolve external references.

To test the Wrap Utility, let’s first create a procedure (test_wrap_proc.sql)

CREATE OR REPLACE PROCEDURE test_wrap_proc
AS
  CURSOR c_languages
  IS
  SELECT ISO_LANGUAGE,NLS_TERRITORY
  FROM FND_LANGUAGES;
BEGIN
  DBMS_OUTPUT.PUT_LINE('LANGUAGE'||'---'||'TERRITORY');
  DBMS_OUTPUT.PUT_LINE('----------------------------');
  FOR r_languages IN c_languages LOOP
  DBMS_OUTPUT.PUT_LINE(r_languages.ISO_LANGUAGE||'---'||r_languages.NLS_TERRITORY);
  END LOOP;
END test_wrap_proc;

Then go to the command prompt and run the Wrap Utility as shown below.

It will create an encrypted file (test_wrap_proc.plb) as shown below.

CREATE OR REPLACE PROCEDURE test_wrap_proc wrapped
a000000
b2
abcd
abcd
abcd
abcd
abcd
abcd
abcd
abcd
abcd
abcd
abcd
abcd
abcd
abcd
abcd
7
181 10b
4hl/uWH5YOAzmM6zJquzeGEGdNAwgxBpDJ5qyi/Ng15TAwLsmVNle72sUpHD8uqHGgdkod4n
bybKy04ihhNaEd1v4UGoQ5LKpPZ+AOi2hmiO8lpow2RqcdJ09MTiums2HFlIKrmPAM7Dgi++
X9J+bvS47l5LJL7g70fRIUdKDOVUwFZCEcQjH4/FvKIII70+Q5KKQAbo3DKbcjp96KfWRXbR
duBC2zCLGfpAIrv5xkG4tK/fiKxVipS6CobsPUOy3ioBPA==

/

To run and view the results of this encrypted file, go to SQL*Plus and compile the procedure.

Oracle has given few Guidelines for Wrapping as below:

  • Wrap only the body of a package or object type, not the specification. This allows other developers to see the information they must use the package or type, but prevents them from seeing its implementation.
  • Wrap code only after you have finished editing it. You cannot edit PL/SQL source code inside wrapped files. Either wrap your code after it is ready to ship to users or include the wrapping operation as part of your build environment. To change wrapped PL/SQL code, edit the original source file and then wrap it again.
  • Before distributing a wrapped file, view it in a text editor to be sure that all important parts are wrapped.

There are few Limitations also:

  • Wrapping is not a secure method for hiding passwords or table names.
  • Wrapping does not hide the source code for triggers. To hide the workings of a trigger, write a one-line trigger that invokes a wrapped subprogram.
  • Wrapping does not detect syntax or semantic errors.
  • Wrapped PL/SQL units are upward-compatible between Oracle Database releases, but are not downward-compatible. For example, you can load files processed by the V8.1.5 wrap utility into a V8.1.6 Oracle Database, but you cannot load files processed by the V8.1.6 wrap utility into a V8.1.5 Oracle Database.

Using DBMS_DDL for Obfuscation:

In prior releases you have been able to use the wrap utility to obfuscate code. However any program unit created dynamically by using EXECUTE IMMEDIATE or DBMS_SQL is not automatically wrapped. This need has been satisfied in the Oracle10gR2.

The DBMS_DDL package contains the WRAP and   CREATE_WRAPPED   methods for obfuscating a single PL/SQL unit that can only be a package specification, package body, function, procedure, type specification, or type body. 

The wrap functions provide a mechanism for obfuscating dynamically generated PL/SQL program units that are created in a database.

Benefits of Dynamic Obfuscation:

Added security to dynamically generated code.

    • Ability to create wrapped code without compiling the program unit
    • Ability to create obfuscated program units on the fly using end-user specification

Use the overloaded WRAP function with EXECUTE IMMEDIATE to create the wrapped code, as the following example illustrates:

DECLARE
  v_Procedure VARCHAR2(4000);
BEGIN
  v_Procedure :=  'CREATE OR REPLACE PROCEDURE test_wrap_proc '
                  || 'AS '
                  || 'CURSOR c_languages '
                  || 'IS '
                  || 'SELECT ISO_LANGUAGE,NLS_TERRITORY '
                  || 'FROM FND_LANGUAGES; '
                  || 'BEGIN '
                  || 'FOR r_languages IN c_languages LOOP '
                  || 'DBMS_OUTPUT.PUT_LINE(r_languages.ISO_LANGUAGE||r_languages.NLS_TERRITORY); '
                  || 'END LOOP; '
                  || 'END test_wrap_proc; ';
  EXECUTE IMMEDIATE DBMS_DDL.WRAP(v_Procedure);
END;

To see the wrapped procedure, select the text from the USER_SOURCE view.

SELECT text
FROM user_source WHERE lower(name) = 'test_wrap_proc';

Now the million dollar question is– Can we unwrap a PL/SQL Code?

Please note: there is no legal way to unwrap a *.plb binary file (as said by Oracle). You are supposed to backup and keep your source files after wrapping them. However this world is filled with lots of skilled hackers and it is not impossible to unwrap PL/SQL Code. If you are more interested, you can check out the below links which contain very interesting discussion about this topic.

Reference:

Oracle® Database PL/SQL Language Reference 11g Release 1 (11.1)

Thanks

Dibyajyoti Koch

XDOLoader Utility to upload XML Templates


The XDOLoader utility is a Java-based command line program to load template (RTF, PDF, and XSL-FO), XML, and XSD files to the XML Publisher database tables. Before uploading any xml template you need to upload your concurrent program (if any) and data definitions through the FNDLOAD utility.

General Syntax to execute the XDOLoader utility as follows:

% java oracle.apps.xdo.oa.util.XDOLoader UPLOAD \
-DB_USERNAME <db_username> \
-DB_PASSWORD <db_password> \
-JDBC_CONNECTION <jdbc_con_string> \
-LOB_TYPE <lob_type> \
-APPS_SHORT_NAME <application_short_name> \
-LOB_CODE <lob_code> \
-LANGUAGE  \
-TERRITORY  \
-XDO_FILE_TYPE <xdo_file_type> \
-NLS_LANG <NLS_LANG> \
-FILE_CONTENT_TYPE <file_content_type> \
-FILE_NAME <file_name> \
-OWNER  \
-CUSTOM_MODE [FORCE|NOFORCE] \
-LOG_FILE <log file>

The parameters are described below:

  • UPLOAD (Mandatory): The first parameter: UPLOAD will be implemented in the feature.
  • DB_USERNAME (Mandatory): Database user name (example: apps).
  • DB_PASSWORD (Mandatory): Database user password (example: manager).
  • JDBC_CONNECTION (Mandatory): JDBC database connection string
    (example: ap000sun:1234:ebs).
  • LOB_TYPE (Mandatory):  XDO LOB type. Valid values are: ‘TEMPLATE’, ‘XML_SCHEMA’ and ‘XML_SAMPLE’
  • APPS_SHORT_NAME (Mandatory):  Application short name (example: AR).
  • LOB_CODE (Mandatory):  XDO LOB code. Enter either the Template Code or the Data Definition Code.
  • LANGUAGE (Optional): ISO two-letter language code (example: en).
  • TERRITORY (Optional): ISO two-letter territory code (example: US), default is ’00’.
  • XDO_FILE_TYPE (Mandatory):  Enter the XDO file type, valid values are: PDF, RTF, XLS, XSL-FO, XSL-HTML, XSL-XML, XSLTEXT, XSD, XML, RTF-ETEXT
  • NLS_LANG (Optional): Enter the NLS_LANG environment variable.
  • FILE_CONTENT_TYPE (Optional): Content type of the file (example: text/html, application/pdf)
  • FILE_NAME (Mandatory): Name of the file you want to upload. You can give full path name of the file.
  • OWNER (Optional): Owner of the template. Default is “ORACLE”.
  • CUSTOM_MODE (Optional): Whether to force update. Valid values are FORCE and NOFORCE (default).
  • LOG_FILE (Optional): Enter a file name for the output log file (default: xdotmpl.log).

Sample script to run the XDOLoader utility to upload a xml template:

echo  "----------------------------------------------------------------------"
echo  "Please enter the following details needed for the XML XDOLoad process"
echo  "This details can be found in the TNS entry"
echo  "----------------------------------------------------------------------"

echo "Enter Apps password  =>"
read apps_pw

echo "Enter Host TNS Database Server name  =>"
read v_host

echo "Enter Host Database TNS Port Number =>"
read v_port

echo "Enter Host Database SID name =>"
read v_sid

echo "Uploading rtf(XXFIN_SAMPLE_TEMPLATE.rtf) for the XML Template Definition"

java oracle.apps.xdo.oa.util.XDOLoader UPLOAD \
-DB_USERNAME apps \
-DB_PASSWORD $apps_pw \
-JDBC_CONNECTION $v_host:$v_port:$v_sid \
-LOB_TYPE TEMPLATE \
-APPS_SHORT_NAME "IBY" \
-LOB_CODE "XXFIN_TEMPLATE_CODE" \
-LANGUAGE en \
-XDO_FILE_TYPE RTF-ETEXT \
-FILE_CONTENT_TYPE 'text/html' \
-FILE_NAME "$XXFIN_TOP/templates/XXFIN_SAMPLE_TEMPLATE.rtf" \
-CUSTOM_MODE FORCE

echo  "Finish uploading rtf(XXFIN_SAMPLE_TEMPLATE.rtf) for the XML Template Definition"

You can run the below query to see the details of your uploaded Template in the database.

SELECT * FROM

XDO_LOBS ORDER BY LAST_UPDATE_DATE DESC;

Format Customization in Oracle Payments using Extensibility Utility Package


From Oracle Accounts Payable, user submits the invoices to Oracle Payments as a Payment Process Request. Oracle Payments uses the invoice information submitted in the Payment Request to create Documents Payable and then groups them into Payments and Payment Instructions for processing payments. This processed information is then recorded in the database tables. The processed payment information is retrieved by Oracle Payments database views to generate the XML extract. The generated XML extract is used in conjunction with the RTF/ETEXT template by Business Intelligence Publisher to generate output.

Oracle Payments provides the IBY_FD_EXTRACT_EXT_PUB extensibility package to construct custom XML element structure that can be added to the payment XML extract generated by Oracle Payments. The package specification and body definition can be found in files ibyfdxes.pls and ibyfdxeb.pls respectively. These files are located in the $IBY_TOP/patch/115/sql directory. 

The package allows custom elements to be created at following levels.

  • Instruction
  • Payment
  • Document Payable
  • Document Payable Line
  • Payment Process Request

You cannot customize the package specification, but package body contains stubbed functions that you can customize. 

The five functions are as follows:

FUNCTION Get_Ins_Ext_Agg(p_payment_instruction_id IN NUMBER) RETURN XMLTYPE

This function allows XML element to be introduced at instruction level and run only once for the instruction.

FUNCTION Get_Pmt_Ext_Agg(p_payment_id IN NUMBER) RETURN XMLTYPE

This function allows XML element to be introduced at payment level and run once for each payment in the instruction.

FUNCTION Get_Doc_Ext_Agg(p_document_payable_id IN NUMBER) RETURN XMLTYPE

This function allows XML element to be introduced at document payable level and run once for each document payable in the instruction.

FUNCTION Get_Docline_Ext_Agg(p_document_payable_id IN NUMBER, p_line_number IN NUMBER) RETURN XMLTYPE

This function allows XML element to be introduced at document payable line level and run once for each document payable line in the instruction.

FUNCTION Get_Ppr_Ext_Agg(p_payment_service_request_id IN NUMBER) RETURN XMLTYPE

This function allows XML element to be introduced at document payable level and run once for each payment process request. 

First determine which function within IBY_FD_EXTRACT_EXT_PUB should be modified. Then write a PL/SQL block similar to the structure given below into the package body function definition, replacing the lines “BEGIN” and “RETURN NULL”, and retaining all other lines:

   <local_xml_variable>  XMLTYPE;

    CURSOR <cursor_name> (<cursor_parameter_name> IN NUMBER) IS
    SELECT XMLConcat(
             XMLElement("Extend",
               XMLElement("Name", '<xml_tag_name1>'),
               XMLElement("Value", <xml_tag_value2>)),
             XMLElement("Extend",
               XMLElement("Name", '<xml_tag_name2>'),
               XMLElement("Value", < xml_tag_value2>))
           )
     FROM <data_table_name>
   WHERE <table_identifier_column> = <cursor_parameter_name>;

  BEGIN

    OPEN <cursor_name> (<function_parameter_name>);
    FETCH <cursor_name> INTO <local_xml_variable>;
    CLOSE <cursor_name>;

    RETURN <local_xml_variable>;

A sample xml file with extended tags will look like:

Then modify the eText template using the new custom elements. Use the following syntax to select the appropriate Name/Value pair.

…/Extend[Name='<xml_tag_name1>’]/Value

You can use BI Publisher Template Viewer to view the final eText Outputs.

Reference Articles in MOS:

  • Format Customization in Oracle Payments for Oracle Applications Release 12 [ID 787467.1]
  • R12: Can Users Customize XML Extract? [ID 457539.1]
  • R12 Oracle Payments Processing ‘How To’ documents [ID 579132.1]
  • R12: How To Assign/Modify XML Publisher Payment Templates [ID 414336.1]

The Sunset through my Lens!


We all love to see the sunset. It is the moment when the trailing edge of the Sun’s disk disappears below the horizon in the west. As a ray of white sunlight travels through the atmosphere to an observer, some of the colors are scattered out of the beam, making it a wonderful phenomenon of nature to see. Here is a small collection by me taken at various places. 

Thanks…