Solve your SUDOKU by SQL!


Oracle Database 11g Release 2 introduces a new feature called Recursive Subquery Factoring with the help of which you can solve your Sudoku.

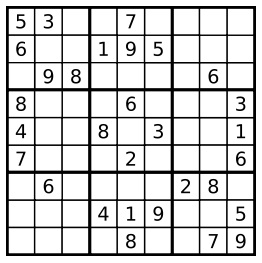
Say you have a Sudoku like:

To solve this Sudoku you first have to transform this to a single string by appending all rows together:(give exact amount of spaces)

“53  7    6  195    98    6 8   6   34  8 3  17   2   6 6    28    419  5    8  79”

Past this string into a Recursive Subquery, run it and you get a new string with your solved Sudoku:


with x( s, ind ) as
( select sud, instr( sud, ' ' )
  from ( select '53 7 6 195 98 6 8 6 34 8 3 17 2 6 6 28 419 5 8 79' sud from dual )
  union all
  select substr( s, 1, ind - 1 ) || z || substr( s, ind + 1 )
  , instr( s, ' ', ind + 1 )
  from x
  , ( select to_char( rownum ) z
  from dual
  connect by rownum <= 9
       ) z
  where ind > 0
  and not exists ( select null
  from ( select rownum lp
                          from dual
  connect by rownum <= 9
                        )
  where z = substr( s, trunc( ( ind - 1 ) / 9 ) * 9 + lp, 1 )
  or z = substr( s, mod( ind - 1, 9 ) - 8 + lp * 9, 1 )
  or z = substr( s, mod( trunc( ( ind - 1 ) / 3 ), 3 ) * 3
  + trunc( ( ind - 1 ) / 27 ) * 27 + lp
  + trunc( ( lp - 1 ) / 3 ) * 6
                                   , 1 )
                 )
)
select s
from x
where ind = 0
/

The output:

534678912672195348198342567859761423426853791713924856961537284287419635345286179

This string can be transformed back to a nice display of the solution.

Solved in 1 Sec!….

My personal note: Sudoku is meant for human minds and not to be solved by a program. Hence you should enjoy solving them with your own minds. However you can use this if you are frozen at some point , unable to proceed further and frustration is about to begin…:)

Have a nice day!

Build a Create Page in OAF!


Here I am posting a step by step tutorial to build a simple CREATE page in OAF. It is a continuation of an earlier tutorial and so you need to go through that first before going through this.

Here is the link: Build Simple Search Page in OAF

Step1: Build a Create Button

  • Select the view EmpSearchPG, right click and select New > TableActions. One region (region1) will be created with region style as ‘FlowLayout’.
  • Change the ID of the above newly created region to ButtonLayoutRN.
  • Right click ButtonLayoutRN and create a new Item.
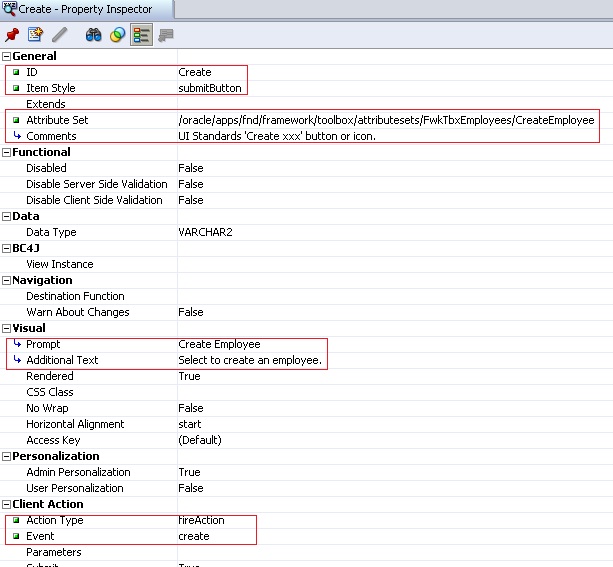
  • Set the below details for the Item
    • ID :Create
    • Item Style : submitButton
    • Attribute Set: /oracle/apps/fnd/framework/toolbox/attributesets/FwkTbxEmployees/CreateEmployee
    • Action Type: fireAction
    • Event: create

Step 2: Set a Controller

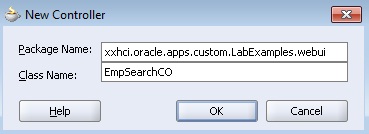
  • Right click PageLayoutRN and select ‘Set New Controller’.
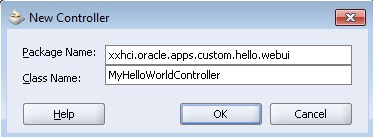
  • Give the package name as ‘xxhci.oracle.apps.custom.LabExamples.webui’.
  • Give the class name as EmpSearchCO.

Add the following logic to processFormRequest of EmpSearchCO.java after super.processFormRequest method.

if (pageContext.getParameter("event").equalsIgnoreCase("create")) {
System.out.println("EmpSearchCO: processing create/update");
pageContext.setForwardURL("OA.jsp?page=/xxhci/oracle/apps/custom/LabExamples/webui/EmployeeCreatePG",
null,
OAWebBeanConstants.KEEP_MENU_CONTEXT,
null, null, true,
OAWebBeanConstants.ADD_BREAD_CRUMB_YES,
OAWebBeanConstants.IGNORE_MESSAGES);
}

You might get red lines under java classes which are not imported. Bring the cursor on these red-lined text and click Alt+Enter (JDev automatically tells you to import the class using Alt+Enter when you move cursor over these lines).

Step 3: Build the Create Employee Page (EmployeeCreatePG)

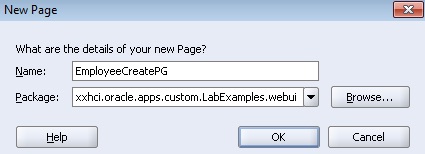
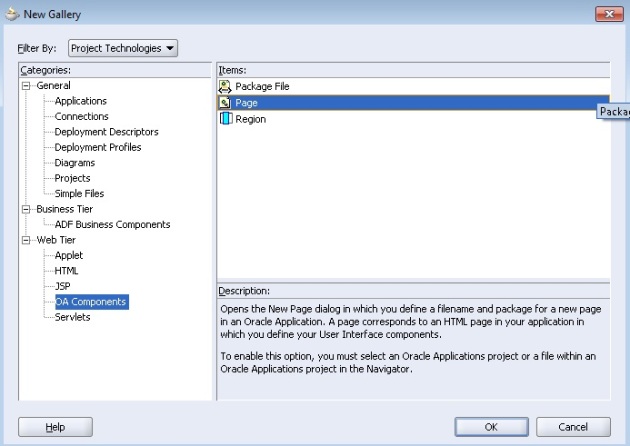
  • Right click on Project >New >Web Tier >OA Components à Page.
  • Set the Page name as EmployeeCreatePG
  • Set the package name as xxhci.oracle.apps.custom.LabExamples.webui
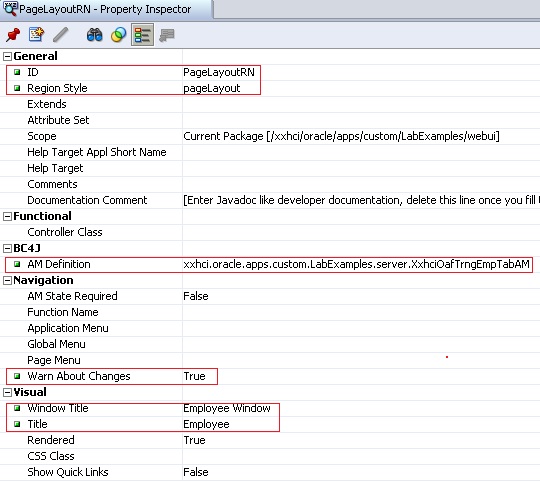
  • Select the pageLayout region of EmployeePG and assign the properties as below
    ID : PageLayoutRN
    AM Definition : xxhci.oracle.apps.custom.LabExamples.server.XxhciOafTrngEmpTabAM
    Window Title : Employee Window
    Title: Employee
    Warn About Change: True

Step 4: Add items to Create Employee Page

  • Create a region under PageLayoutRN and assign ID as PageButtonsRN.
  • Set the region style as pageButtonBar

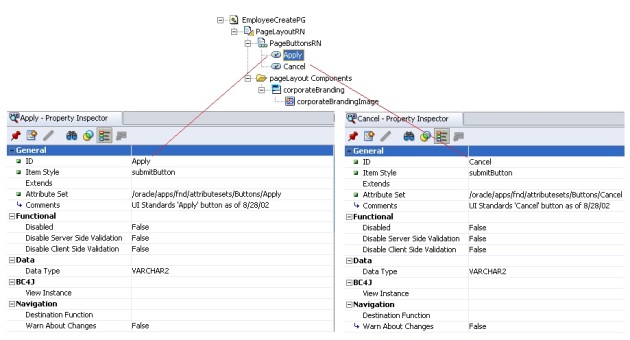
Now we need to create two buttons in this region as APPLY and CANCEL.

For Apply Button:

  • Right click on PageButtonsRN > New > Item.
  • Set the properties as
    ID :Apply
    Item Style :submitButton
    Attribute Set : /oracle/apps/fnd/attributesets/Buttons/Apply
    Additional Text :Click to save the transaction
  • Action Type: fireAction
  • Event: Apply

For Cancel Button:

  • Right click on PageButtonsRN > New > Item.
  • Set the properties as
    ID : Cancel
    Item Style : submitButton
    Attribute Set :/oracle/apps/fnd/attributesets/Buttons/Cancel
    Additional Text : Click to cancel the transaction
  • Action Type: fireAction
  • Event: Cancel

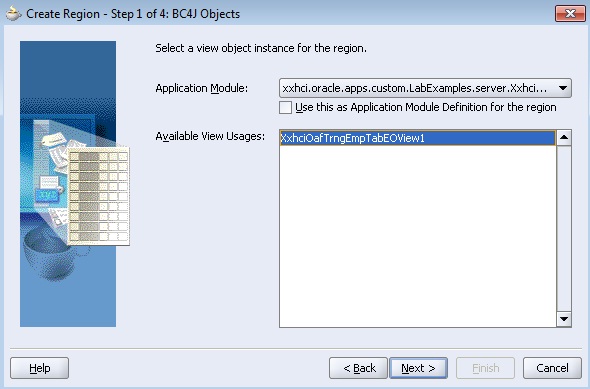
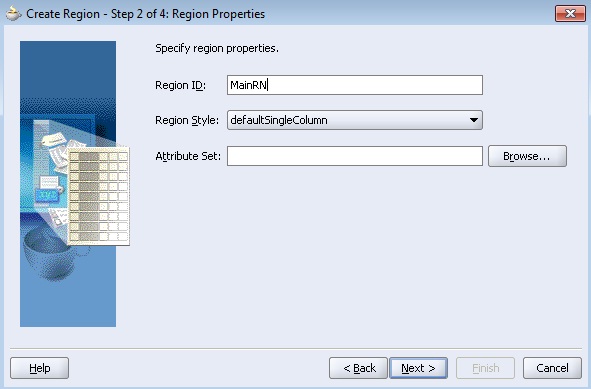
For text items in page: Right click on PageLayoutRN à New à Region using wizard. Enter data as shown in below screenshots

Step 4.1: Select AM and VO instance created during search page

Step 4.2: Give Region ID as MainRN and Region Style as defaultSingleColumn

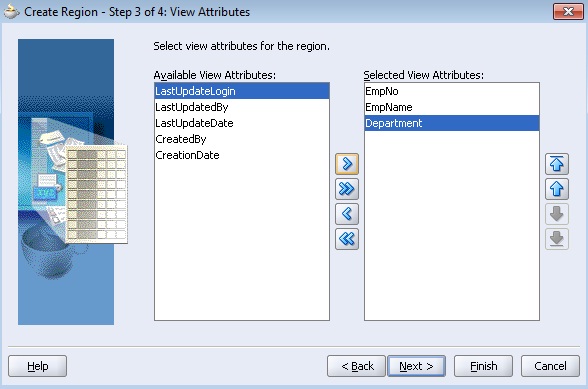
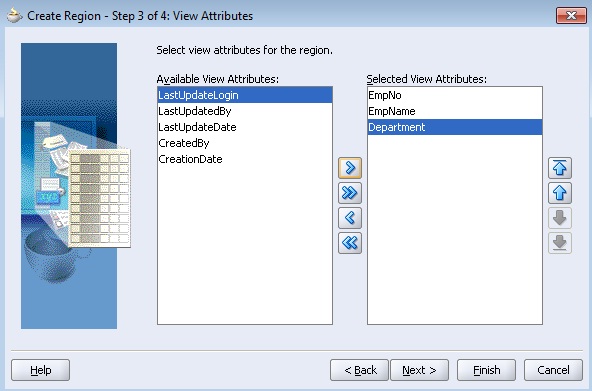
Step 4.3: Select attributes as below (EmpNo, EmpName and Department)

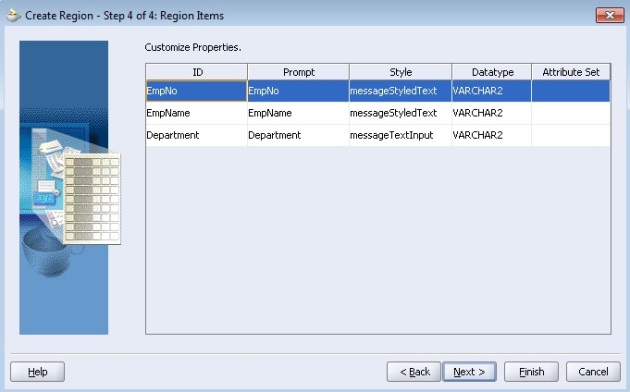
Step 4.4: Change the prompts of items as shown below (messageInputText)

Click on finish for step 5.

Change the Region Style for MainRN to messageComponentLayout. This is done now as above region wizard, doesn’t have support for messageComponentLayout. Click on Yes button when the confirm window pops for change of region style.

Step5: Adding Model Layer Code

Add following code to XxhciOafTrngEmpTabAMImpl.java. Add import statements at the start and rest of the methods with the class definition.

import oracle.jbo.Row;
import oracle.apps.fnd.framework.OAViewObject;
import oracle.jbo.Transaction;
import oracle.jbo.domain.Number;
import oracle.jbo.RowSetIterator;

       // Creates a new employee.

        public void createEmployee()
        {
        OAViewObject vo = (OAViewObject)getXxhciOafTrngEmpTabEOView1();
        // Per the coding standards, this is the proper way to initialize a
        // VO that is used for both inserts and queries. See View Objects
        // in Detail in the Developer's Guide for additional information.
        if (!vo.isPreparedForExecution())
        {
        vo.executeQuery();
        }
        Row row = vo.createRow();
        vo.insertRow(row);
        // Required per OA Framework Model Coding Standard M69
        row.setNewRowState(Row.STATUS_INITIALIZED);
        } // end createEmployee()

         // Executes a rollback including the database and the middle tier.

         public void rollbackEmployee()
         {
         Transaction txn = getTransaction();
         // This small optimization ensures that we don't perform a rollback
         // if we don't have to.
         if (txn.isDirty())
         {
         txn.rollback();
         }
         }

        //Commits the transaction.

        public void apply()
        {
        getTransaction().commit();
        }

Add the following import statement and modify the create method in XxhciOafTrngEmpTabEOImpl as follows:

Add this as a part of import statements

import oracle.apps.fnd.framework.server.OADBTransaction;

Modify the create method as below

    public void create(AttributeList attributeList) {
        super.create(attributeList);
        OADBTransaction transaction = getOADBTransaction();
        Number employeeId = transaction.getSequenceValue("FWK_TBX_EMPLOYEES_S");
        setEmpNo(employeeId.toString());
    }

Step6: Add Controller logic for Create Employee Page

Right click on PageLayoutRN of EmployeeCreatePG > Set New Controller.

Give the values as
Package : xxhci.oracle.apps.custom.LabExamples.webui
Class Name : EmployeeCO

Add the below code to the new CO

Import Statements:

import java.io.Serializable;
import oracle.apps.fnd.common.MessageToken;
import oracle.apps.fnd.framework.OAApplicationModule;
import oracle.apps.fnd.framework.OAException;
import oracle.apps.fnd.framework.OAViewObject;
import oracle.apps.fnd.framework.webui.OADialogPage;
import oracle.apps.fnd.framework.webui.OAWebBeanConstants;

processRequest (after super.processRequest):

            if (!pageContext.isBackNavigationFired(false)) {
                OAApplicationModule am =
                    pageContext.getApplicationModule(webBean);
                am.invokeMethod("createEmployee");
            } else {
                // We got here through some use of the browser "Back" button, so we
                // want to display a stale data error and disallow access to the
                OADialogPage dialogPage = new OADialogPage(STATE_LOSS_ERROR);
                pageContext.redirectToDialogPage(dialogPage);
            }

processFormRequest (after super.processFormRequest):

      OAApplicationModule am = pageContext.getApplicationModule(webBean);
          // Pressing the "Apply" button means the transaction should be validated
          // and committed.
      if (pageContext.getParameter("event").equalsIgnoreCase("Apply")) {
                   OAViewObject vo =
                      (OAViewObject)am.findViewObject("XxhciOafTrngEmpTabEOView1");
                  String employeeName =
                      (String)vo.getCurrentRow().getAttribute("EmpName");
                  String employeeNum =
                      (String)vo.getCurrentRow().getAttribute("EmpNo");
                  am.invokeMethod("apply");
                  MessageToken[] tokens =
                  { new MessageToken("EMP_NAME", employeeName),
                    new MessageToken("EMP_NUMBER", employeeNum) };
                  OAException confirmMessage =
                      new OAException("AK", "FWK_TBX_T_EMP_CREATE_CONFIRM", tokens,
                                      OAException.CONFIRMATION, null);
                  pageContext.putDialogMessage(confirmMessage);
                      pageContext.forwardImmediately("OA.jsp?page=/xxhci/oracle/apps/custom/labExamples/webui/EmpSearchPG",
                                                     null,
                                                     OAWebBeanConstants.KEEP_MENU_CONTEXT,
                                                     null, null, true,
                                                     OAWebBeanConstants.ADD_BREAD_CRUMB_NO);
              }
      // If Cancel button is pressed, rollback the transaction
       else if (pageContext.getParameter("event").equalsIgnoreCase("Cancel")) {
                  am.invokeMethod("rollbackEmployee");
                      pageContext.forwardImmediately("OA.jsp?page=/xxhci/oracle/apps/custom/labExamples/webui/EmpSearchPG",
                                                     null,
                                                     OAWebBeanConstants.KEEP_MENU_CONTEXT,
                                                     null, null, false,
                                                     OAWebBeanConstants.ADD_BREAD_CRUMB_NO);

              }

Step 7: Save all and Run the EmpSearchPG to test the page

Flow Diagram

The Final Output:

One year of Blogging!


The act of putting pen to paper encourages pause for thought, this in turn makes us think more deeply about life, which helps us regain our equilibrium.  ~Norbet Platt

I am very happy to say all my blog readers, this blog has completed one year. It is like I have started blogging only yesterday. But my blog is 1-year-old today…!!

I started to blog without much interest in it. Exactly one year ago, on this same day, I read one article about ‘Why One should write a Blog?’. I was free on that day

, and so decided to create a blog just to write and post some random thoughts. I searched in Google for blog hosting sites and found WordPress to be the best blogging platform. Although I like Blogspot, I choose WordPress because the themes provided by them at that time were quite nice and professional.

Well, this is a small story why and how I created the blog. As times goes on, I found that many people share their work, ideas and thoughts that they have gained during their experience in Oracle EBS and various technologies. Inspired by that, I also started putting things that I have worked on during my journey in Oracle Application. I believe in the fact that writers literally create a new world from scratch. Writing is an exploration.

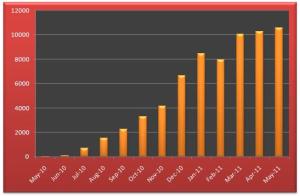
Month wise Blog Stats

This is the 150th Post in the blog. The blog has already passed 65000 visits in the first year with visitors from 150 countries around the world.

By keeping this enthusiasm in sharing the information, I will update my blog with all my learning’s and my experience…..

I would like to thank all the people who visited and read my blog…


Either write something worth reading or do something worth writing. —Benjamin Franklin

Thanks

Dibyajyoti Koch

Build simple search page in OA Framework


Here are the steps to create a simple search page in OA Framwork. I have used OAF Version 12.1.1 for this exercise. There are many ways to do this and here I have followed one of these.

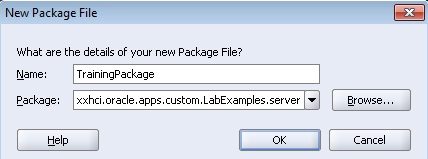
Step 1: Create a Package

All BC4J model components must belong to a Business Components (BC4J) package. So create a package with a name like xxhci.oracle.apps.custom.LabExamples.server.

Step2: Create an Entity Object (EO)

Entity objects encapsulate business logic and DML operations for application tables.
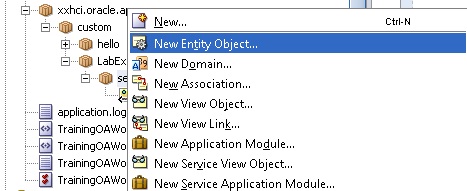
To create a new entity object in the above defined Business Components (BC4J) package:

1. In the JDeveloper Navigator, select the BC4J package where you want to create your entity object.

2. Right click and select ‘New Entity Object’

3. Do the following steps to create an EO.

2.1 Specify a Schema Object (the exact name of the table for the entity object)

2.2 In the Attributes page (Step 2 of 5), you should see all the columns in the table that you specified in the Name page.
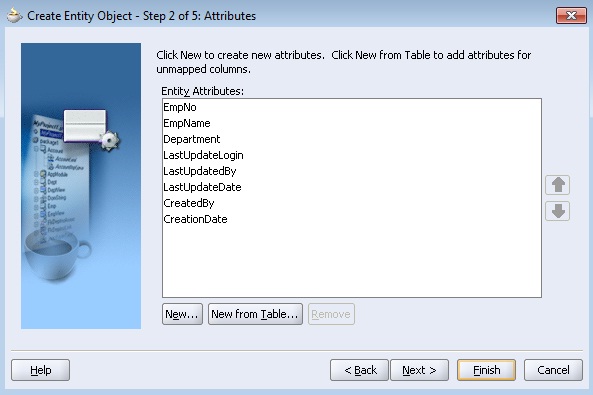
Select New… to create a transient attribute that is used in the business logic, such as a calculated OrderTotal in a purchase order that is used for approval checking.

2.3 In the Attribute Settings page (Step 3 of 5), verify or set the following information for each of the entity object’s attributes:
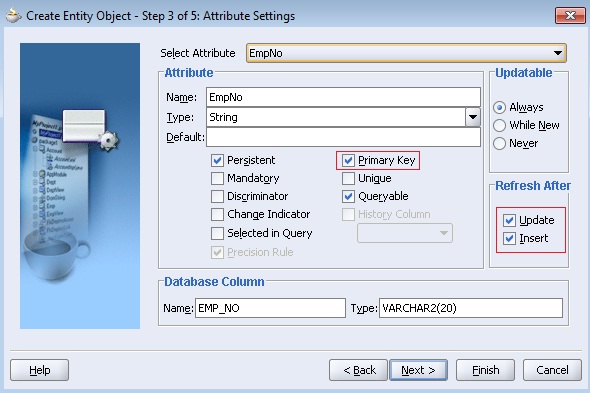
The Attribute and Database Column Name and Type properties default correctly from the table definition. For primary key columns, ensure that the Primary Key and Mandatory checkboxes are selected. For columns that are never updateable, or updateable only when new, select the appropriate Updateable radio button. For columns whose values change after database triggers execute, select the Refresh After update or insert as appropriate.

2.4 In the Java page (Step 4 of 5) page:

  • Check the option for generating an Entity Object Class. In the Generate Methods box, opt to generate Accessors, a Create Method and a Remove Method.

2.5 Click on ‘Generate default view object’ to create a VO. Select Finish to save your entity object definition and implementation. BC4J will create an XML definition file and a Java implementation file for your entity object.
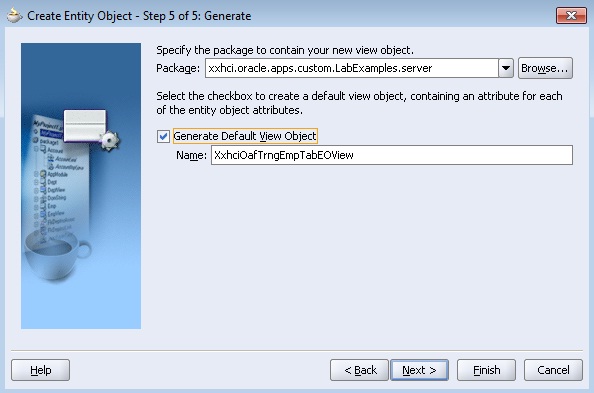
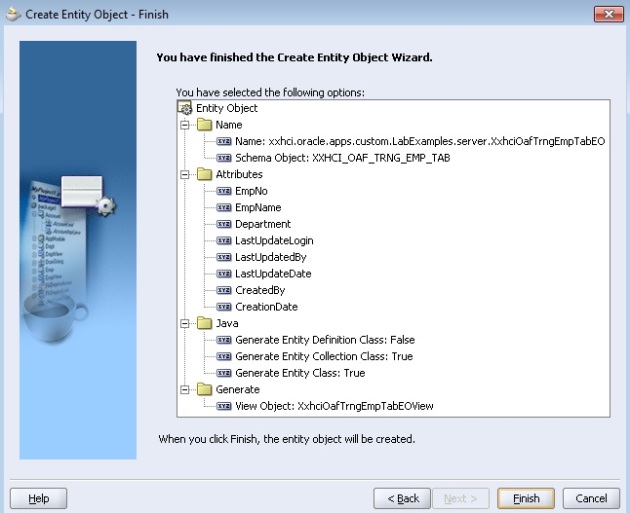
Step3: Create an View Object (VO)

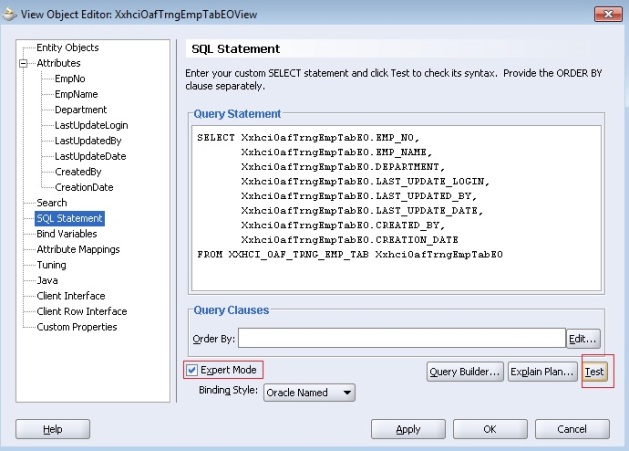
If you click ‘Generate default view object’ tab as mentioned above, you don’t have to create a VO separately. If you forgot this, you have to create a VO. Click on the VO to test the SQL Statement generated by the EO and check in the ‘Expert Mode’.
Step4: Create a New Application Module (AM)

To create a new application module in a Business Components (BC4J) package:

1. In the JDeveloper Navigator, select the BC4J package where you want to create your application module.

2. From the main menu, choose File > New to open the New Object Gallery.
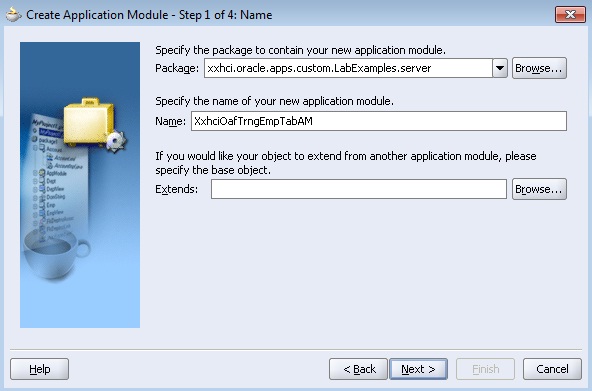
Select the view object.
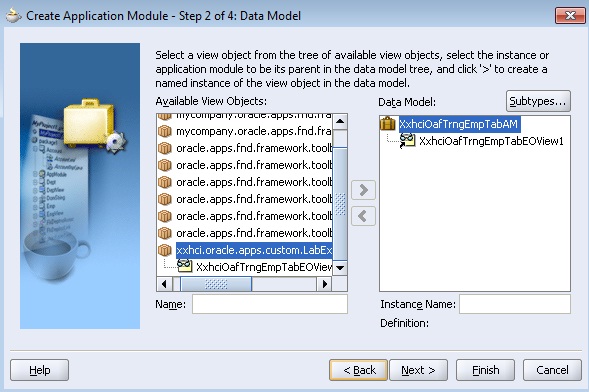
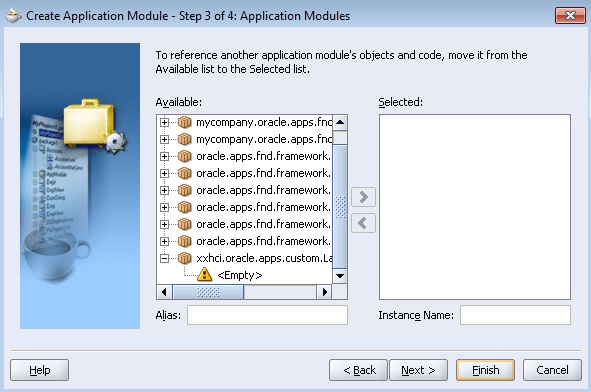
In the Java page (Step 4 of 5), deselect the Generate Java File(s) checkbox ONLY if you are certain that you won’t be writing any code for your application module (you can always delete the class later if you find that you don’t need it, so it’s probably best to simply generate it at this point unless you are creating a simple container for LOV view objects).

Select Finish to create your application module. BC4J will create an XML definition and implementation file.

Step5: Create a Page (EmpSearchPG)

Create the EmpSearchPG page as follows

  • Right click on project à New à Web Tier à OA Components à Page
  • Give the Page Name as EmpSearchPG and package as “xxhci.oracle.apps.custom.LabExamples.webui”
  • Select region1 page from Structure Window and change its properties as
    ID à PageLayoutRN
  • Select the AM Definition as ‘xxhci.oracle.apps.custom.LabExamples.server.XxhciOafTrngEmpTabAM’
  • Give a Window Title as ‘Employees Search Window’
  • Give a Title as ‘Employees’

Step6: Add a Query region and Results table

  • Right click on PageLayoutRN à New à Region. Set the properties of the new region as
    ID à QueryRN
  • Select the Region Style as ‘query’ and Construction Mode as ‘resultBasedSearch’.
  • Right click on QueryRN region on structure navigator à New à Region using wizard.
  • Select the AM and VO which we have created in earlier steps as shown in below figure.
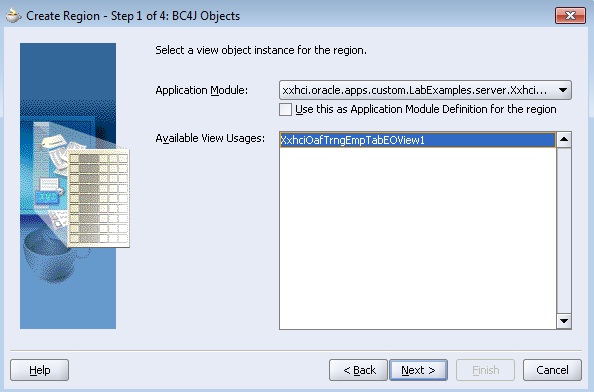

Set the Region Style as Table
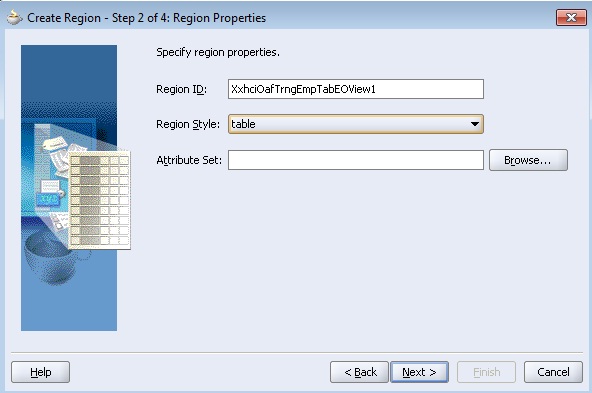
Change the Prompt and Style for all three items.
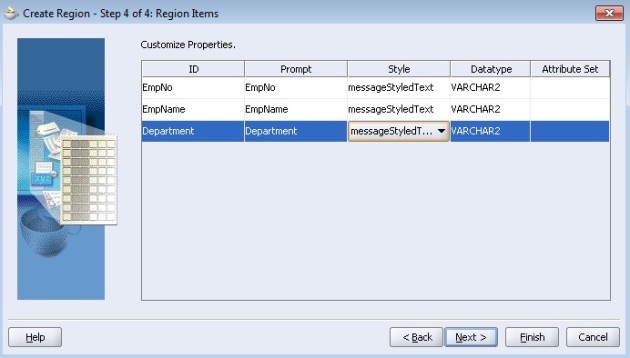
Step7: Changes the Item Properties

Go to EmpNo item and set the Search Allowed property to true. Similarly do the steps for EmpName and Department also.
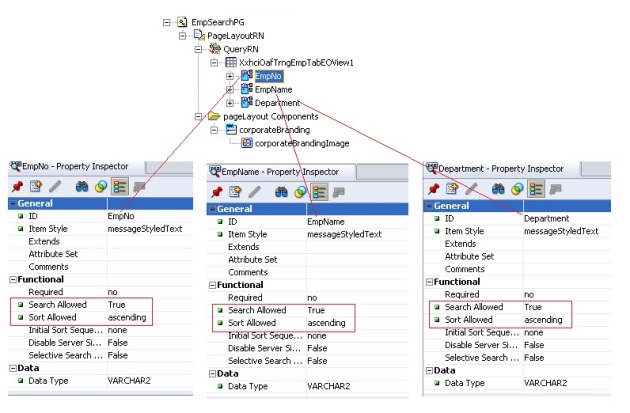
Step8: Save all changes (Save All).

Step9: Run the Page (EmpSearchPG)

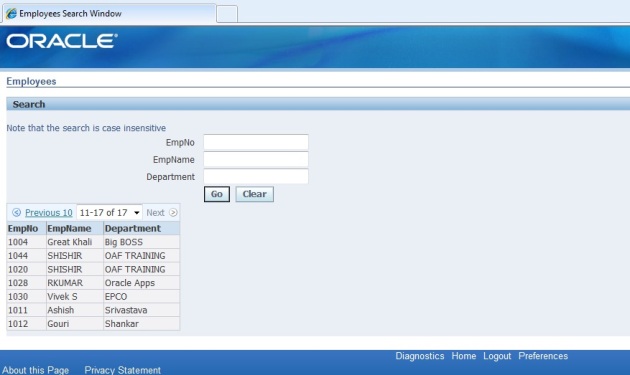
Creation of search page is complete. Run the EmpSearchPG to test the page. If everything works fine for you, you should able to view an output like below:
Few Note:

Understanding Query Regions

When you add a query region to a pageLayout region, OA Framework automatically generates an oracle.apps.fnd.framework.webui.beans.layout.OAQueryBean which, depending on its configuration, works in concert with a child table, advanced table or HGrid to implement any combination of simple search, advanced search and view panels. OA Framework automatically generates buttons as appropriate for toggling between the applicable regions.

Construction Modes:

There are three construction modes available. In the above example we have used ‘resultBasedSearch’ construction mode. Here is a brief comparison of the three modes.

1] resultsBasedSearch:

  • OA Framework automatically renders both the Simple and Advanced search regions based on the designated queryable items in the associated table.
  • The search regions automatically include both a Go and a Clear button.
  • OA Framework automatically executes the underlying search when the user selects the Go button.

2] autoCustomizationCriteria:

  • OA Framework automatically renders both the Simple and Advanced search regions based on the corresponding Simple search and Advanced search regions that you define and specify as named children of the query region.
  • The search regions automatically include a Go button. In addition, the Advanced search region includes a Clear button.
  • OA Framework automatically executes the underlying search when the user selects the Go button. However, developers must explicitly define mappings between items in the Search panel and items in the table region.

3] none

  • The Search regions are rendered based on the Simple Search and Advanced Search regions that you define and specify as named children of the query region.
  • You must implement your own Go button in this mode.
  • The underlying search must be executed by the developer.
OAF vs ADF 10g


With the emergence of next generation Fusion technology middleware stack there is confusion between the technologies OA framework and ADF among Oracle developers especially for the people who are developing extensions for Oracle Applications 11i/R12. Both are Oracle technologies for developing web based User Interface with Jdeveloper. Here is a detailed overview of OA framework and ADF.

OA Framework:

OAF (Oracle Applications Framework) is used to create the web based Oracle Application extensions and it is the default web technology for 11i and R12 development. It is closely integrated with Oracle Apps hence it is meaningless outside apps context. OAF is a model-view-controller technology stack which comprised of OA framework View (regions and pages) and BC4j respectively as view and model layers.

OAF and Oracle Applications 11i/R12

  • OAF includes AOL which provides e-business functionality like functions, menus, responsibility, functional security, data security, messages, profiles, flexfields, and concurrent programs.
  • List of Values – validation, auto complete, auto clear is available in OAF.
  • Transactional Search – Query Bean is available in OAF.
  • Data export, Configurable pages and Rich text editor is available in OAF.
  • OAF supports translatable table (TL tables).
  • Who columns like created by, modified by, creation date, modified date are supported in OAF.
  • Since OAF is tightly integrated with E-Business session management is done automatically.
  • Menu that appears at the top of the page is integrated with AOL menus. Hence the menus can be configured dynamically by manipulating AOL menus and no coding is required.
  • Functional security is available in OAF which allows you to configure the responsibility dynamically for the user.
  • User authentication is done from SSO. So no need to configure or write any code.
  • Data security is available.
  • Secured against cross site scripting attack.
  • OAF page access can be tracked.
  • Standards and guidelines are available for developing extensions in OAF which is the most important thing.
  • Reusable regions are available in OAF.
  • UI cannot be migrated to ADF 11g (may be in the future Oracle will come up with migration utility for UI but even then only declarative pages would be migrated and the UI pages should have followed the coding standards strictly).
  • BC4J can be migrated with minimal code change.
  • Controller cannot be migrated hence you have to rewrite all the logics in the controller if you want to migrate it to ADF 11g.

ADF 10g

ADF 10g (Application Development Framework) is the core technology for Fusion Applications and uses lot of open standards and technologies. ADF can also be used for common J2EE applications because ADF technology stack allows you choose between various options. ADF is primarily comprised of ADF Faces, ADF model and ADFbc (which is previously known as bc4j in OAF)

ADF 10g and Oracle Applications 11i/R12

  • ADF 10g does not include any support for AOL
  • List of Values and its associated features like validation, auto complete and clear does not exists in ADF.
  • No Transactional search, Data Export, Configurable pages or Rich text editor.
  • No support of Translatable Table and who columns.
  • No support for E-business suite session management.
  • No support for integration with Oracle Workflow.
  • E-business security features are totally unavailable in ADF 10g. (security features include Data security, functionally security, SSO etc)
  • Page access cannot be tracked in ADF 10g.
  • No support of for menus in ADF.
  • Reusable regions cannot be created in ADF 10g.
  • ADF 10g can be easily migrated to ADF 11g.
  • And most of all you cannot extend or personalize the existing page with the help of ADF.

And the advantage of ADF 10g over OA framework is that your investments would be protected when you want to migrate to ADF 11g.

ADF has many advantages starting from the underlying architecture, the level of support for Web Services and SOA development and going all the way to the actual development experience of UIs using visual editor and drag and drop binding. 

Conclusion

Consider following points when choosing technology.

  • If you want to build few pages with close integration of e-business suite then opt for OA framework. Remember if you want to migrate your code to ADF 11g in the future, you have to follow the coding standards strictly and code all the business logic in bc4j rather than handling the logic in controller.
  • If you don’t want a close integration e-business suite or your building entirely new application then go for ADF 10g. 
Reference: prasanna-adf.blogspot.com

Personalization vs Extension vs Customization


In Oracle EBS development, the terms Personalization, Customizations & Extensions are often used interchangeably. It often creates confusion among developers regarding the meaning of these terms. These terms are critically important terms that developers must understand and use properly. Let’s discuss them briefly here to simply understand what they are.

What is Personalization?

Personalization is the process of making changes to the User Interface (UI) from within an Oracle E-Business Suite Form/Page. It is possible to make personalization to both Form-based and OA Framework based pages.

What is Extension?

Extension is the process of making changes to the programmatic (i.e., PL/SQL or Java) elements of an E-Business Suite form/page. It is possible to extend both Forms based and OA Framework-based pages.

What is Customization?

Customization is the process of creating new forms/pages. While Oracle does provide tools to do this (i.e., Oracle Forms and JDeveloper 10g with OA Extension), this is the least supported option.

Create Hello World Page in OAF!


This tutorial will tell you the basic steps to create a Hello Word Page in OA Framework.

Earlier Posts:

1] Initial Setup in JDeveloper for OAF Development

2] Run Oracle Defined Hello World Page

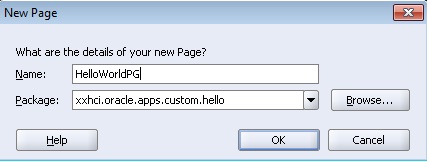
Step 1: Start JDeveloper. Create a New OA Workspace and Empty OA Project with the New…Dialog


Step 2: Create the OA Component Page

JDeveloper creates your top-level page layout region for you automatically when you create your page.

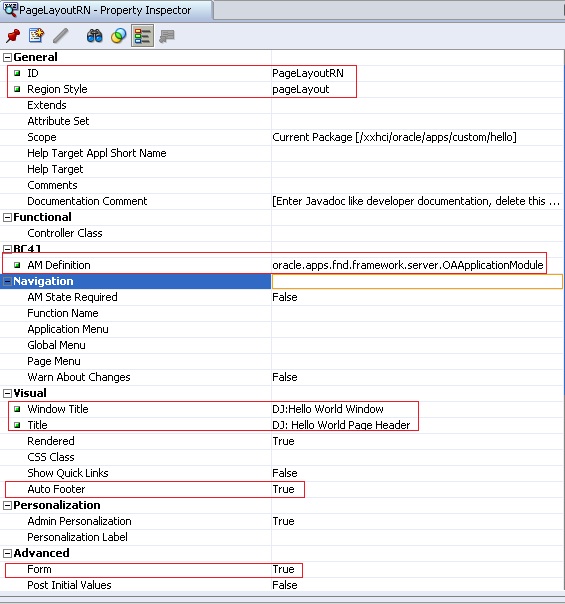
Step 3: Modify the Page Layout (Top-level) Region

  • Set the ID property to PageLayoutRN.
  • Verify that the Region Style property is set to pageLayout.
  • Verify that the Form property is set to True.
  • Verify that the Auto Footer property is set to True.
  • Set the Window Title property to <your name>: Hello World Window Title. This becomes the window title for the page.
  • Set the Title property to <your name>: Hello World Page Header.
  • Set the AM Definition property to oracle.apps.fnd.framework.server.OAApplicationModule (you will have to type in the value). This is a generic application module supplied by the OA Framework.

Step 4: Create the Second Region (Main Content Region)

Create your second region under the page layout region by selecting the page layout region in the Structure window and choosing New > Region from the context menu.

  • Replace the default value in the ID property with MainRN.
  • Set the Region Style property to messageComponentLayout (this provides an indented single- or multiple-column layout for the child items of the region).

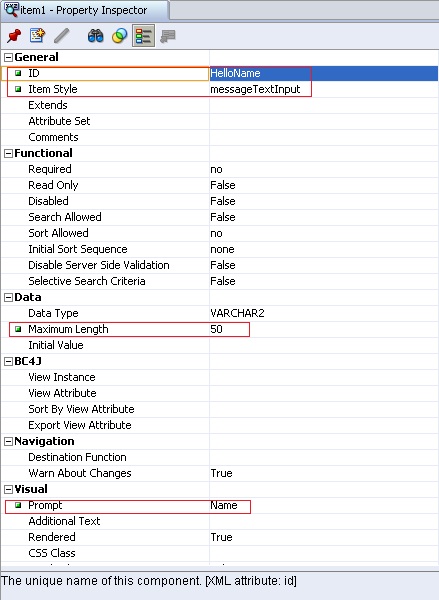
Step 5: Create the First Item (Empty Field)

Create your first item under the second region (main content region) by selecting the second region in the Structure window and choosing New > messageTextInput from the context menu. This item will take any name as parameter.
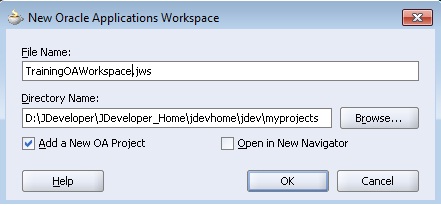
  • Set the ID property to HelloName.
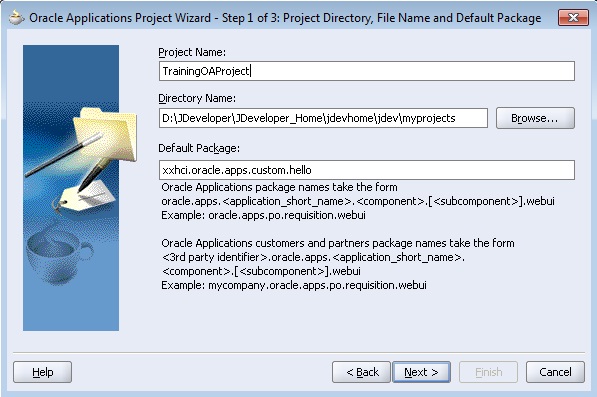
  • Verify that your Item Style property is set to messageTextInput (this style provides a text label and an input field).
  • Set the Prompt property to Name.
  • Set the Visual Length to 20.
  • Set the Data Maximum Length to 50.

Step 6: Create a Container Region for the Go Button

To add a non-message-type bean such as a submitButton to a messageComponentLayout region, you must first add the bean to a messageLayout region.

Select the messageComponentLayout region and select New > messageLayout.


Name this region ButtonLayout.

Step 7: Create the Second Item (Go Button)

Create your Go button item by selecting the messageLayout region, ButtonLayout, in the Structure window and choosing New > Item from the context menu.

Set the following properties for your button item:

  • Set the value of the ID property to Go.
  • Set the Item Style property to submitButton.
  • Set the Attribute Set property to /oracle/apps/fnd/attributesets/Buttons/Go.


Step 8: Save Your Work (Save-All)

Step 9: Run Your Page Using the Run Option

You can try out your page using the Run option on the context menu. If you are using a database other than what you already have in your project settings, you will need to modify the Runtime Connection project settings by selection your project file and choosing Project Properties… from the main menu. Specifically, you must use a combination of Username, Password, (Responsibility) Application Short Name and Responsibility Key that is valid for your database to enable your session to log in.

The output will be like:


Here the Go Button has no functionality. Now to add some functionality to this Button, we need to add a Controller.

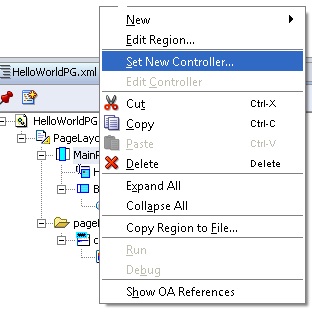
Step 10: Add a Controller

Add a controller to display a message when the user clicks on the Go button. Select your second region (MainRN) and choose Set New Controller… from the context menu.

Step 11: Edit Your Controller


When you create a controller .java file will be automatically created and it will contain below 2 methods.

  • public void processRequest(OAPageContext pageContext, OAWebBean webBean) { }
  • public void processFormRequest(OAPageContext pageContext, OAWebBean webBean) { }

Now you need to add the below code in the java file to add the required functionality.

  • Add the following line as the last line of the import section to make the OA Framework OAException routines available:
import oracle.apps.fnd.framework.OAException;
  • Add the below code in processFormRequest method
      if (pageContext.getParameter("Go") != null)
      {
      String userContent = pageContext.getParameter("HelloName");
      String message = "Hello, " + userContent + "!";
      throw new OAException(message, OAException.INFORMATION);
      }

Step 12: Build Your Controller

Build your controller by selecting Rebuild from the context menu within the code editor window.

Step 13: Test Your Work Using the Run Option

Save your work, and then test it using the Run option. Type something into your field and then click the Go button. You should see the page with an informational message that contains what you typed into the field, as shown:

Congratulations…! You have created your first OA Page. I will try to put articles on how to create search, create and update page in OAF in future. See ya!

What is Fan Trap in Discoverer and how it handles them?


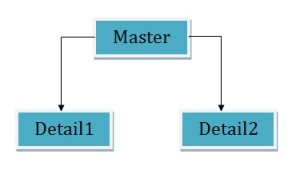
Fan Trap is a situation while running discoverer reports that return unexpected results due to a group of joined database tables. The most common manifestation of a fan trap occurs when a master table is joined to two or more detail tables independently.

If you use a straightforward SQL statement to aggregate data points here, you may get incorrect results due to fan trap. Now, if you enable fan trap detection in Discoverer and if you use Discoverer to aggregate the data points, Discoverer will never return incorrect results.

Example of Fan Trap:

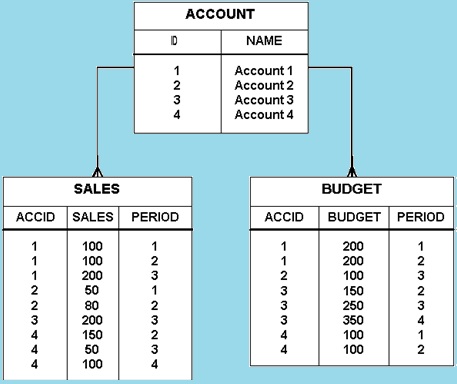
Consider an example fan trap schema that includes a master folder (ACCOUNT) and two detail folders (SALES and BUDGET), as shown below:

Now let’s say we need to answer the question, “What is the total sales and total budget by account?

Straightforward SQL statement approach:

SELECT Account.Name,
       SUM(sales),
       SUM(budget)
FROM
      Account,
      Sales,
      Budget
Where
      Account.id=Sales.accid
      AND Account.id=Budget.accid
GROUP BY Account.Name;

Account    Sales Budget

Account 1   800   1200

Account 2   130    200

Account 3    600   750

Account 4    600   600

The above results are incorrect, because they are based on a single query in which the tables are first joined together in a temporary table, and then the aggregation is performed. However, this approach causes the aggregates to be summed (incorrectly) multiple times.

Discoverer Approach:

If we run the query in Discoverer interrogates the query, detects a fan trap, and rewrites the query to ensure the aggregation is done at the correct level. Discoverer rewrites the query using inline views, one for each master-detail aggregation, and then combines the results of the outer query.

Here are the results from discoverer which is correct:

Account   Sales   Budget

Account 1  400      400

Account 2  130      100

Account 3  200      750

Account 4  300      200

How to enable fan trap in discoverer?

By default, fan trap detection is always enabled for you. If you want to disable it (however not recommended), you can logon to Discoverer Plus, go to Tools > Options >Advanced Tab and click on ‘Disable fan trap detection’.

How Discoverer handles fan trap?

If a fan trap is detected, Discoverer can usually rewrite the query using inline views to ensure the aggregation is done at the correct level. Discoverer creates an inline view for each master-detail aggregation, and then combines the results of the outer query.

In some circumstances, Discoverer will detect a query that involves an unresolvable fan trap schema, as follows:

  • If the detail folders use different keys from the master for the join
  • If there is a direct join relationship between the detail folders (thereby creating an ambiguous circular relationship)
  • If non-aggregated values are chosen from more than one of the detail folders
  • If more than one detail folder has a separate join relationship to a different master folder

In the above circumstances, Discoverer disallows the query and displays an error message.

SRW Package in Oracle Report


SRW (Sql Report Writer) Package is a built in package in Oracle Reports Builder. It is a collection of PL/SQL constructs that include many functions, procedures, and exceptions you can reference in any of your libraries or reports.

The PL/SQL provided by the SRW package enables you to perform such actions as change the formatting of fields, run reports from within other reports, create customized messages to display in the event of report error, and execute SQL statements. There are nearly 70 functions, procedures, and exceptions are there in this package. Here I am giving brief information and uses of few important functions, procedures, and exceptions.

SRW.MESSAGE:

It is a Procedure that displays a message with the message number and text that you specify. It is mainly used to debug a report in Reports Builder.

SRW.MESSAGE(msg_number NUMBER, msg_text CHAR);

Example:

function foo return boolean is
begin
  if :sal < 0 then
    SRW.MESSAGE(100, 'Found a negative salary. Check the EMP table.');
    raise SRW.PROGRAM_ABORT;
  else
    :bonus := :sal * .01;
  end if;
  return(true);
end;

SRW.PROGRAM_ABORT:

This exception stops the report execution and raises the following error message: REP-1419: PL/SQL program aborted. SRW.PROGRAM_ABORT stops report execution when you raise it.

SRW.DO_SQL:

This procedure executes the specified SQL statement from within Reports Builder. The SQL statement can be DDL (statements that define data), or DML (statements that manipulate data). DML statements are usually faster when they are in PL/SQL, instead of in SRW.DO_SQL.

Since you cannot perform DDL statements in PL/SQL, the SRW.DO_SQL packaged procedure is especially useful for performing them within Reports Builder.

Example:

FUNCTION CREATETABLE RETURN BOOLEAN IS
BEGIN
  SRW.DO_SQL('CREATE TABLE TEST_EMP (EMPNO NUMBER NOT NULL
    PRIMARY KEY, SAL NUMBER (10,2)) PCTFREE 5 PCTUSED 75');
    RETURN (TRUE);
   EXCEPTION
    WHEN SRW.DO_SQL_FAILURE  THEN
    SRW.MESSAGE(100, 'ERROR WHILE CREATING TEST_EMP TABLE.');
    RAISE
    SRW.PROGRAM_ABORT;
END;

SRW.DO_SQL_FAILURE:

Reports Builder raises this exception when the SRW.DO_SQL packaged procedure fails. This exception stops the report execution and raises the following error message:

REP-1425: Error running DO_SQL package – REP-msg ORA-msg.

SRW.GET_REPORT_NAME:

This function returns the file name of the report being executed.

SRW.GET_REPORT_NAME (report_name);

Example:

function AfterPForm return boolean is
    my_var varchar2(80);
  BEGIN
    SRW.GET_REPORT_NAME (my_var);
    SRW.MESSAGE(0,'Report Filename = '||my_var);
   RETURN (TRUE);
  END;

SRW.RUN_REPORT:

This procedure synchronously executes the specified report within the context of the currently running report.

SRW.RUN_REPORT (“report=test.rdf … “)

SRW.SET_FIELD:

This procedure sets the value of a character, number, or date field. This is useful when you want to conditionally change a field’s value.

SRW.SET_FIELD (object_id, text CHAR | number NUM | date DATE);

Example:

Suppose you want to conditionally change the number of a field, based on each employee’s salary. In the format trigger for the field, you could type the following:

FUNCTION CHGFIELD RETURN BOOLEAN IS
TMP NUMBER;
 BEGIN
  if :sal >= 5000 then
  tmp := :sal * 1.10;
  srw.set_field (0, tmp);
 else
  srw.set_field (0, 4000);
 end if;
 RETURN (TRUE);
END;

SRW.SET_FIELD should be used only to change the contents of a field’s datatype, not change the field to a different datatype.

Others in Brief:

  • SRW.SET_FONT_FACE: This procedure specifies font face for a CHAR, DATE, or NUMBER field. SRW.SET_FONT_FACE(‘arial’);
  • SRW.SET_FONT_SIZE: This procedure specifies font size for a CHAR, DATE, or NUMBER field. SRW.SET_FONT_SIZE(10);
  • SRW.SET_FONT_STYLE: This procedure specifies font style for a CHAR, DATE, or NUMBER field. SRW.SET_FONT_STYLE(SRW.ITALIC_STYLE);
  • SRW.SET_FORMAT_MASK: This procedure specifies the format mask for the DATE or NUMBER field. SRW.SET_FORMAT_MASK(‘mask’);
  • SRW.SET_TEXT_COLOR: This procedure specifies the global text color of the CHAR, DATE, or NUMBER field. SRW.SET_TEXT_COLOR(‘color’);


Registering Custom PLSQL Functions in Discoverer


Although Discoverer provides many functions for calculation in reports, sometime we require to use custom PL/SQL functions to meet additional Discoverer end user requirements (for example, to provide a complicated calculation). For this we first need to create the functions in database through Toad or other PL/SQL editors.

To access custom PL/SQL functions using Discoverer, you must register the functions in the EUL. When you have registered a custom PL/SQL function, it appears in the list of database functions in the “Edit Calculation dialog” and can be used in the same way as the standard Oracle functions.

Note: To register a PL/SQL function you must have EXECUTE privilege on that function.

You can register custom PL/SQL functions in two ways:

  •  Import automatically, by importing the functions (recommended)
  •  Manually

How to register custom PL/SQL functions automatically:

To register PL/SQL functions automatically you must import them in the following way:

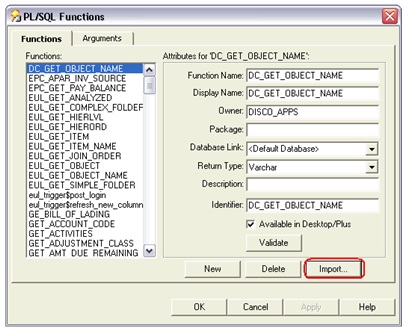
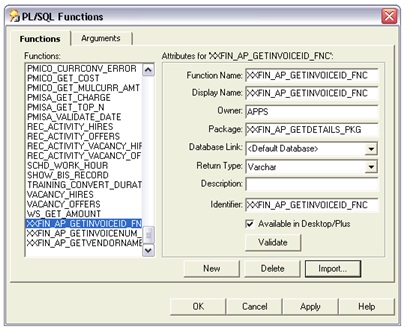
 1. Choose Tools | Register PL/SQL Functions to display the “PL/SQL Functions dialog: Functions tab”.


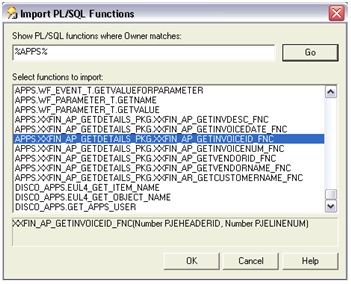
 2. Click Import to display the “Import PL/SQL Functions dialog”. This dialog enables you to select the PL/SQL functions that you want to import.


3. Select the functions that you want to import. You can select more than one function at a time by holding down the Ctrl key and clicking another function.


4. Click OK.

Discoverer imports the selected functions and displays the function details in the “PL/SQL Functions dialog: Functions tab”. Information about the selected functions is imported automatically. In other words, you do not have to manually enter information or validate the information.


5. Click OK.

The PL/SQL function is now registered for use in Discoverer.

How to register custom PL/SQL functions manually:

To manually register a PL/SQL function for use in Discoverer:

1. Choose Tools | Register PL/SQL Functions to display the “PL/SQL Functions dialog: Functions tab”.

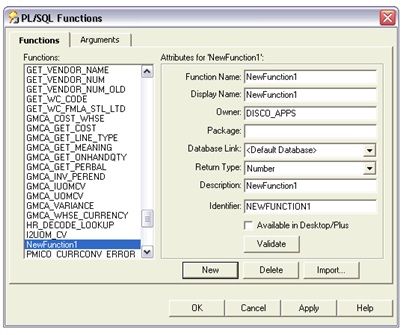
2. Click New and specify the function attributes.


3. Click Validate to check the validity and accuracy of the information you have entered.

4. If the function is invalid, correct the attributes and click Validate again.

5. (Optional) if the function accepts arguments:

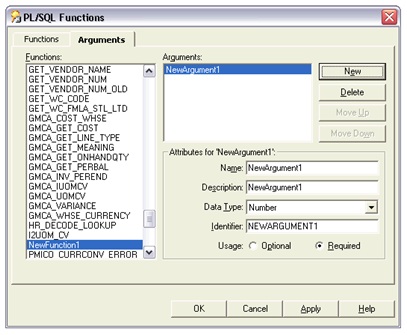
a. Display the “PL/SQL Functions dialog: Arguments tab”.

b. On the Arguments tab, click New and specify the argument attributes.


6. Click OK when you have finished defining the function.

The custom PL/SQL function is now registered for use in Discoverer.

It is always recommended to register PL/SQL functions by importing automatically (especially if you have many functions to register), because it is easy to make mistakes when manually entering information about functions. When you import functions, all of the information about each function (for example, names, database links, return types, lists of arguments) is imported.