How to create concurrent programs from database?


Here are couple of APIs useful for creating any concurrent programs from the backend database.

1)    Registering the Executable from back-end:

Usually we create executable in the front-end, but this can be done from the database tier i.e. back-end too. Below is the PL/SQL code to create an executable from back-end.

BEGIN
  FND_PROGRAM.executable(executable => 'XXFIN TEST EXECUTABLE' , -- Executable Name
  application=>'XXFIN' , -- Application Short Name
  short_name=>'XXFINTSTEXE' , -- Executable Short Name
  description=>'Test Executable created from Backend' ,     -- Description,DEFAULT NULL
  execution_method=>'PL/SQL Stored Procedure',              -- Execution Method
  execution_file_name=>'XXFIN_TEST_PROC' ,                  -- Execution File Name,DEFAULT NULL
  subroutine_name=>NULL ,                                   -- Subroutine Name,DEFAULT NULL
  icon_name=>NULL ,                                         -- Icon Name,DEFAULT NULL
  language_code=>'US' ,                                     -- Language Code,DEFAULT 'US'
  execution_file_path=>NULL                                 -- Execution File Path, DEFAULT NULL
  );
  COMMIT;
END;

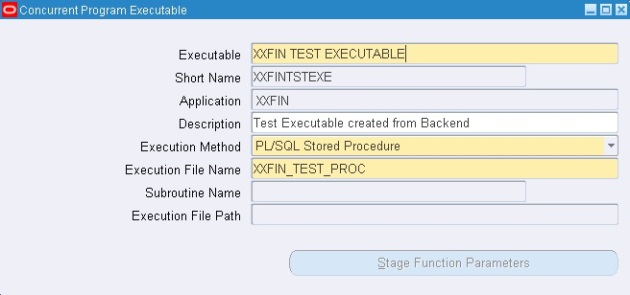
View from Frontend:

Creating Executable

Notes:

1] The above API inserts the new records in FND_EXECUTABLES and FND_EXECUTABLES_TL table.

2] You can use the below query to get all the Execution Methods available:

SELECT MEANING “Execution Method”

FROM fnd_lookup_values

WHERE lookup_type = ‘CP_EXECUTION_METHOD_CODE’

AND enabled_flag  = ‘Y’;

2)    Registering the Concurrent program from back-end:     

Usually we create Concurrent program in the front-end, but this can be done from the database tier too. Below is the program to create a Concurrent program from back-end.

BEGIN
  FND_PROGRAM.register(program =>'Test CP from DB', -- CP Name
  application =>'XXFIN' , -- Application Short Name
  enabled =>'Y',                                    -- Flag to Enable/Disable a CP
  short_name =>'XXFINTSTCPDB', -- CP Short Name
  description =>'Test CP created from Backend' ,    -- Description,DEFAULT NULL
  executable_short_name =>'XXFINTSTEXE', -- Executable Short Name
  executable_application =>'XXFIN' , -- Executable Application Short Name
  execution_options => NULL,                        -- Execution Options,DEFAULT NULL,
  priority => NULL,                                 -- Priority,DEFAULT NULL,
  save_output =>'Y',                                -- Save Output,DEFAULT 'Y',
  PRINT =>'Y' ,                                     -- Print,DEFAULT 'Y',
  cols => NULL, -- DEFAULT NULL,
  rows => NULL, -- DEFAULT NULL,
  style => NULL,                                    -- DEFAULT NULL,
  style_required =>'N' ,                            -- DEFAULT 'N',
  printer => NULL,                                  -- DEFAULT NULL,
  request_type => NULL,                             -- DEFAULT NULL,
  request_type_application => NULL,                 -- DEFAULT NULL,
  use_in_srs =>'N' ,                                -- DEFAULT 'N',
  allow_disabled_values =>'N' ,                     -- DEFAULT 'N',
  run_alone =>'N' ,                                 -- DEFAULT 'N',
  output_type =>'TEXT',                             -- DEFAULT 'TEXT'
  enable_trace =>'N' ,                              -- DEFAULT 'N',
  restart =>'Y' ,                                   -- DEFAULT 'Y',
  nls_compliant =>'Y' ,                             -- DEFAULT 'Y',
  icon_name => NULL,                                -- DEFAULT NULL,
  language_code => 'US',                            -- DEFAULT 'US',
  mls_function_short_name => NULL,                  -- DEFAULT NULL,
  mls_function_application => NULL,                 -- DEFAULT NULL,
  incrementor => NULL, -- DEFAULT NULL,
  refresh_portlet => NULL                           -- DEFAULT NULL,
  );
  COMMIT;
END;

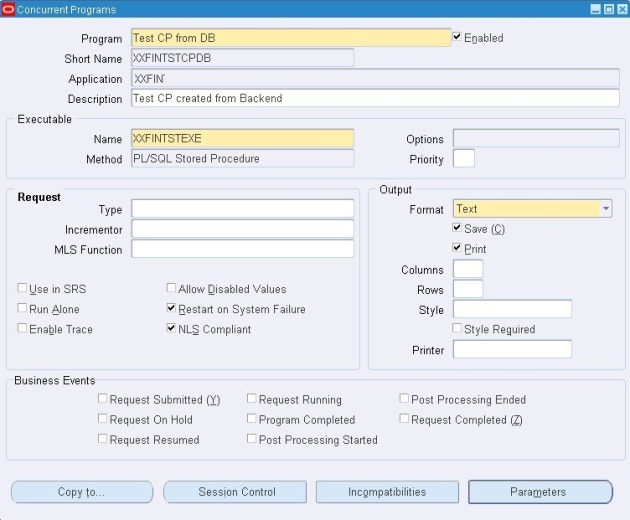
View from Frontend:

Creating CP

Notes:

1] The various output types are ‘PS’, ‘PDF’, ‘HTML’, ‘TEXT’, ‘PCL’, ‘XML’.

2] The above API inserts the new records in fnd_concurrent_programs and FND_CONCURRENT_PROGRAMS_TL

3)    Attaching the concurrent program to the request group

Usually we Attach Concurrent program to the request group in the front-end, but this can be done from database tier too. Below is the program to Attach Concurrent program to the request group from back-end.

BEGIN
  FND_PROGRAM.add_to_group('XXFINTSTCPDB', -- Concurrent Program Short Name
  'XXFIN' , -- Application Short Name
  'All Reports',                           -- Report Group Name
  'SQLAP'); -- Report Group Application
  COMMIT;
END;

Apart from these APIs, the above package also contains to create/delete parameters, delete executable, and delete concurrent programs and all.
How to design An Accounting Flexfield Parameter for your Report?


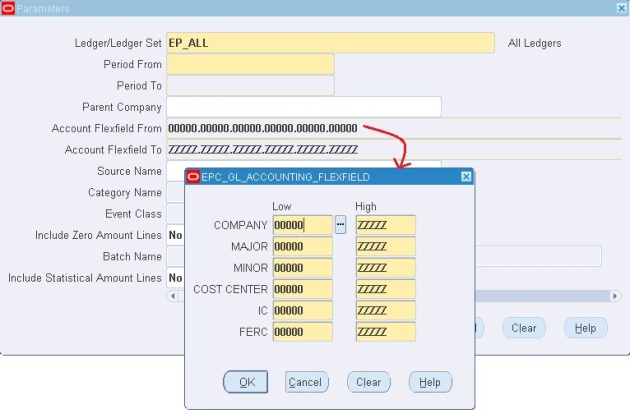
If you want to design similar functionality as below in your report parameter, do the below steps.

Concurrent Program

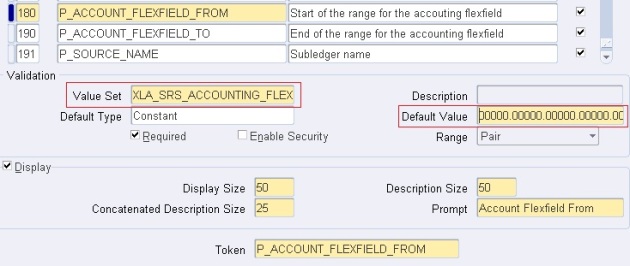
1] Design two parameters to capture Accounting Flexfield From and To and use them in your report. Also set the default values.

CP Parameters

Here use the value set: XLA_SRS_ACCOUNTING_FLEXFIELD

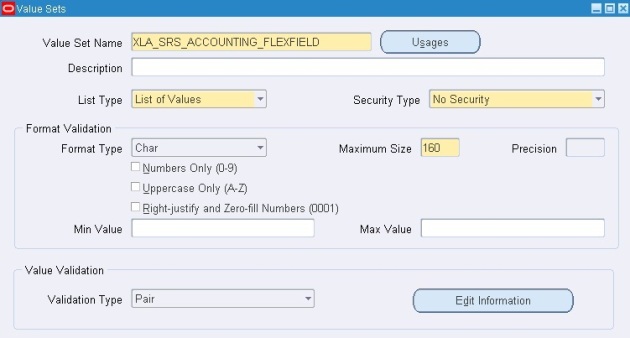
2] XLA_SRS_ACCOUNTING_FLEXFIELD valueset is designed as below:

XLA_SRS_ACCOUNTING_FLEXFIELD

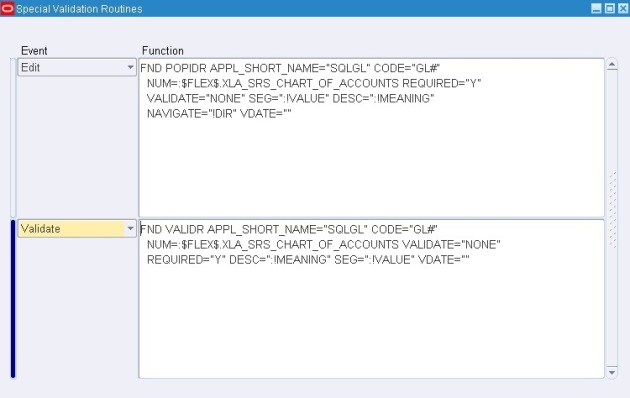
Edit:

FND POPIDR APPL_SHORT_NAME=”SQLGL” CODE=”GL#”

  NUM=:$FLEX$.XLA_SRS_CHART_OF_ACCOUNTS REQUIRED=”Y”

  VALIDATE=”NONE” SEG=”:!VALUE” DESC=”:!MEANING”

  NAVIGATE=”!DIR” VDATE=””

Validate:

FND VALIDR APPL_SHORT_NAME=”SQLGL” CODE=”GL#”

  NUM=:$FLEX$.XLA_SRS_CHART_OF_ACCOUNTS VALIDATE=”NONE”

  REQUIRED=”Y” DESC=”:!MEANING” SEG=”:!VALUE” VDATE=””

Special Value set

How to Clear Cache from Oracle Application without Bouncing Listener?


Caching Framework in oracle apps R12 comes with an administration User interface and it is available under the Functional Administrator responsibility. This interface can be used to perform administrative operations including changing the time-out values for cache components, looking at cache usage statistics, and clearing caches.

Here are the steps to clear all Global Cache:

1] Login to Functional Administrator responsibility – then choose Home.

2] Choose the ‘Core Services’ Tab – then the “Caching Framework” Sub-Menu.

3] Proceed to choose ‘Global Configuration’ from the left hand side menu.

4] In the far right choose ‘Clear all Cache’ button.

5] A screen prompts and confirms that the action will clear all cache on the middle tier server – choose Yes. Essentially, this just forces all user sessions to engage and validate – rather than using cached values.

6] A confirmation message is displayed, confirming that all cache has been cleared across middle tiers.

7] Proceed to test and confirm whatever change was made to the preference, profile, etc….

Please note that clearing the OA Framework cache can cause data issues if multiple users are engaged and transacting data in the application at the time cache is cleared. Please use this utility with proper care.

You can also clear cache for specific component. To do that you need to go to Core Services -> Caching Framework -> Tuning. Query the application (for example iProcurement) or by Name or code.  Select the component and clear the cache.

Messages in Oracle Application


What is a message in Oracle Application?

Oracle Application uses the Message Dictionary to store translatable Error and Warning messages that can be used by any programs written in Forms, Reports, Java, or PL/SQL.

These messages mainly provide information about business rule errors, such as missing or incorrect data, and how to resolve them, warn about the consequences of intended actions, inform about the status of an application, pages, or business objects, and indicate that processes and actions are performing or are completed.

By using the messages in the Message Dictionary, you can define standard messages that you can use in all your applications(Oracle Form, Reports, OAF and ADF), provide consistency for messages within and across all your applications, define flexible messages, and change or translate the text of your messages without regenerating or recompiling your application code.

How will you create a Message?

In Application Developer Responsibility, navigate to (N) Application | Messages.

Using that screen, the new messages can be created by entering records. The contents entered in field message text become visible to the end user. The content of the message can optionally have tokens, which act as placeholders for dynamically substituted values at runtime.

You can also create messages from OAF Page. For that-

1] Login to Functional Administrator responsibility – then choose Home.

2] Choose the ‘Core Services’ Tab – then the “Messages” Sub-Menu.

The components of a Message:

Component Name Description
Name Every message must have a unique name. You should include a unique prefix that makes it easier to find your custom messages and that helps to avoid name conflicts with non-custom messages.
Language Select the language that your message is written in.
Application Select the application that the message belongs, this will usually be the custom application.
Current Message Text Message text is required. This is a brief statement of the operation attempted and the problem that occurred as a result, or information that the user needs to know. The maximum field size for messages stored in the Message Dictionary is 240 characters.
Number A unique and persistent message number can be included with each message. When displayed, the number takes the format of (Application ShortnameNumber). If the message does not have a message number, the formatted number is not displayed.
Type The message type indicates which message components are applicable, determines whether implicit logging and incident creation occurs, and determines the logging level if the message is logged.
Maximum Length Maximum number of display characters the translators can use to translate the message.
Description Description of the Message.
Alert Category This will allow user interfaces and other programs to filter exception messages based on category. The types are Product, System, Security and User.
Alert Severity This will allow user interfaces and other programs to filter exception messages based on severity. The types can be: Critical, Error or Warning.
Log Severity This group indicates the Log severity levels like: Unexpected, Error, Exception, Event, Procedure, Statement or Off.

About Tokens:

Tokens are identified in the message text by their use of & and all uppercase letters. The token values are supplied at runtime by the code that raises the message. For example, the following token &FIELD_NAME is replaced by a field when the user receives the error message on their screen:

“A Value must be entered for &FIELD_NAME.

Becomes: “A Value must be entered for PO Number.”.

Table Used by Messages Dictionary:

FND_NEW_MESSAGES stores application messages for Message Dictionary. Each row includes the application to which the message belongs, the language the message is in, the message name, the message text, and the message number. You need one row for each application message in each of the language.

APIs to Set, Retrieve, Clear the messages:

Use the Message Dictionary APIs to retrieve a Message Dictionary message. The PL/SQL methods are in the FND_MESSAGE package and the Java methods are in the messageService package. There are many functions and procedures in the package- FND_MESSAGE. However I have given the details of three most used procedures below.

procedure SET_NAME(APPLICATION in varchar2, NAME in varchar2)

In Database Server, this Sets a message name in the global area without actually retrieving the message from Message Dictionary.

procedure SET_TOKEN(TOKEN     in varchar2,

                        VALUE     in varchar2,

                        TRANSLATE in boolean default false)

This procedure defines a message token with a value. In Database Server, SET_TOKEN adds a token/value pair to the global area without actually doing the substitution. Call FND_MESSAGE.SET_TOKEN once for each token/value pair in a message.

function GET return varchar2

This function gets a translated and token substituted message from the message dictionary database. It returns NULL if the message cannot be found. If this function is called from a stored procedure on the database server side, the message is retrieved from the Message Dictionary table. If the function is called from a form or forms library, the message is retrieved from the messages file on the forms server.

How to use message in PL/SQL Concurrent Program:

fnd_message.clear;
fnd_message.set_name ('XXSCM', 'XXSCM_MANDATORY_FIELD');
fnd_message.set_token('FIELD_NAME', 'PO Number');
--Now get the final string
l_message := fnd_message.get;
--Display the message text in output of concurrent program
fnd_file.put_line(fnd_file.OUTPUT, l_message);

How to use message in Oracle Forms:

fnd_message.set_name('XXSCM', 'XXSCM_MANDATORY_FIELD');
fnd_message.set_token('FIELD_NAME', 'PO Number');
fnd_message.show;

How to use message in OA Framework Controller:

String sReturnMsg = oapagecontext.getMessage("XXSCM", " XXSCM_MANDATORY_FIELD ", new MessageToken[] {new MessageToken(" FIELD_NAME ", "PO Number") });

Example of retrieving message from the Stack:

-- setting INVALID_USER as the current message
fnd_message.set_name('FND', 'INVALID_USER');
-- setting value for token NAME for INVALID_USER message
fnd_message.set_token('NAME', 'TESTUSER');
-- saving the current message onto stack
fnd_message.push;
-- setting LOGIN_FAILED as the current message
fnd_message.set_name('FND', 'LOGIN_FAILED');
-- saving the current message onto stack
fnd_message.push;
-- poping one message out of stack and set it as the current message
fnd_message.pop;
-- get the translated and token subsituted LOGIN_FAILED message
-- then clear the current message
msg := fnd_message.get;
-- poping one message out of stack and set it as the current message
fnd_message.pop;
-- get the translated and token subsituted INVALID_USER message
-- then clear the message
msg := fnd_message.get;

FNDLOAD for Messages:

Download:

FNDLOAD apps/apps 0 Y DOWNLOAD $FND_TOP/patch/115/import/afmdmsg.lct XXSCM_MANDATORY_FIELD_MSG.ldt  FND_NEW_MESSAGES APPLICATION_SHORT_NAME=’XXSCM’ MESSAGE_NAME=”XXSCM_MANDATORY_FIELD”

Upload:

FNDLOAD apps/apps 0 Y UPLOAD $FND_TOP/patch/115/import/afmdmsg.lct XXSCM_MANDATORY_FIELD_MSG.ldt

SQL related to Oracle Application Messages:

SELECT m.message_name,
  m.message_text,
  m.message_number,
  a.application_short_name
FROM FND_NEW_MESSAGES M,
  FND_APPLICATION a
WHERE upper(m.message_text) LIKE upper('%&Enter_Message_Text%')
AND m.language_code  = 'US'
AND M.APPLICATION_ID = a.APPLICATION_ID;

SELECT m.message_name,
  m.message_text,
  m.message_number,
  a.application_short_name
FROM FND_NEW_MESSAGES M,
  FND_APPLICATION a
WHERE m.message_name LIKE '%&Enter_Message_Name%'
AND m.language_code  = 'US'
AND M.APPLICATION_ID = a.APPLICATION_ID;

API to Load Values into Value Sets


DECLARE
----------------------------Local Variables---------------------------
   l_enabled_flag             VARCHAR2 (2);
   l_summary_flag             VARCHAR2 (2);
   l_who_type                 FND_FLEX_LOADER_APIS.WHO_TYPE;
   l_user_id                  NUMBER                := FND_GLOBAL.USER_ID;
   l_login_id                 NUMBER                := FND_GLOBAL.LOGIN_ID;
   l_value_set_name           FND_FLEX_VALUE_SETS.FLEX_VALUE_SET_NAME%TYPE;
   l_value_set_value          FND_FLEX_VALUES.FLEX_VALUE%TYPE;
BEGIN

   l_value_set_name             :='VALUE_SET_NAME';
   l_value_set_value            :='VALUE_SET_VALUE';
   l_enabled_flag               := 'Y';
   l_summary_flag               := 'N';
   l_who_type.created_by        := l_user_id;
   l_who_type.creation_date     := SYSDATE;
   l_who_type.last_updated_by   := l_user_id;
   l_who_type.last_update_date  := SYSDATE;
   l_who_type.last_update_login := l_login_id;

     fnd_flex_loader_apis.up_value_set_value
                  (p_upload_phase               => 'BEGIN',
                   p_upload_mode                => NULL,
                   p_custom_mode                => 'FORCE',
                   p_flex_value_set_name        => l_value_set_name,
                   p_parent_flex_value_low      => NULL,
                   p_flex_value                 => l_value_set_value,
                   p_owner                      => NULL,
                   p_last_update_date           => TO_CHAR(SYSDATE, 'YYYY/MM/DD HH24:MI:SS'),
                   p_enabled_flag               => l_enabled_flag,
                   p_summary_flag               => l_summary_flag,
                   p_start_date_active          => TO_CHAR(SYSDATE, 'YYYY/MM/DD HH24:MI:SS'),
                   p_end_date_active            => NULL,
                   p_parent_flex_value_high     => NULL,
                   p_rollup_flex_value_set_name => NULL,
                   p_rollup_hierarchy_code      => NULL,
                   p_hierarchy_level            => NULL,
                   p_compiled_value_attributes  => NULL,
                   p_value_category             => 'VALUE_SET_NAME',
                   p_attribute1                 => '40912',
                   p_attribute2                 => NULL,
                   p_attribute3                 => NULL,
                   p_attribute4                 => NULL,
                   p_attribute5                 => NULL,
                   p_attribute6                 => NULL,
                   p_attribute7                 => NULL,
                   p_attribute8                 => NULL,
                   p_attribute9                 => NULL,
                   p_attribute10                => NULL,
                   p_attribute11                => NULL,
                   p_attribute12                => NULL,
                   p_attribute13                => NULL,
                   p_attribute14                => NULL,
                   p_attribute15                => NULL,
                   p_attribute16                => NULL,
                   p_attribute17                => NULL,
                   p_attribute18                => NULL,
                   p_attribute19                => NULL,
                   p_attribute20                => NULL,
                   p_attribute21                => NULL,
                   p_attribute22                => NULL,
                   p_attribute23                => NULL,
                   p_attribute24                => NULL,
                   p_attribute25                => NULL,
                   p_attribute26                => NULL,
                   p_attribute27                => NULL,
                   p_attribute28                => NULL,
                   p_attribute29                => NULL,
                   p_attribute30                => NULL,
                   p_attribute31                => NULL,
                   p_attribute32                => NULL,
                   p_attribute33                => NULL,
                   p_attribute34                => NULL,
                   p_attribute35                => NULL,
                   p_attribute36                => NULL,
                   p_attribute37                => NULL,
                   p_attribute38                => NULL,
                   p_attribute39                => NULL,
                   p_attribute40                => NULL,
                   p_attribute41                => NULL,
                   p_attribute42                => NULL,
                   p_attribute43                => NULL,
                   p_attribute44                => NULL,
                   p_attribute45                => NULL,
                   p_attribute46                => NULL,
                   p_attribute47                => NULL,
                   p_attribute48                => NULL,
                   p_attribute49                => NULL,
                   P_ATTRIBUTE50                => NULL,
                   p_flex_value_meaning         => l_value_set_value,
                   p_description                => NULL
                   );
      COMMIT;

   EXCEPTION
      WHEN OTHERS
      THEN
         DBMS_OUTPUT,PUT_LINE('Error is ' || SUBSTR (SQLERRM, 1, 1000));
   END;

How to Use Global Variables in Form Personalization?


Here let’s say the requirement is to run a concurrent program through a custom menu from an oracle form and in that concurrent program parameters, we need to fetch some values from the oracle form itself. In that case we need to first assign the form values to some Global Variables and then use them in the concurrent program parameters. Here are the Steps:

1] Go to Form Personalization for that Form (Use: Help > Diagnostics > Custom Code > Personalize)

2] Create one custom menu (ex. SPECIAL15) on the triggering event: WHEN-NEW-FORM-INSTANCE.

3] On the triggering event: SPECIAL15, do the following actions:

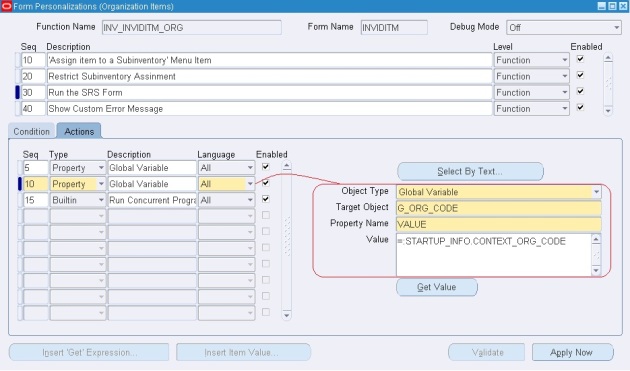
  • Select Type as ‘Property’ and select Object Type as ‘Global Variable’.
  • Give a name to the global variable in the ‘Target Object’ tab. (Ex. G_ITEM_NAME, G_ORG_CODE)
  • Select the Property Name as ‘VALUE’.
  • In the value tab- Give ‘=:Block_name.Field_name’ (Use: Help > Diagnostics > Examine). This is the value which you want to put in the global variable.

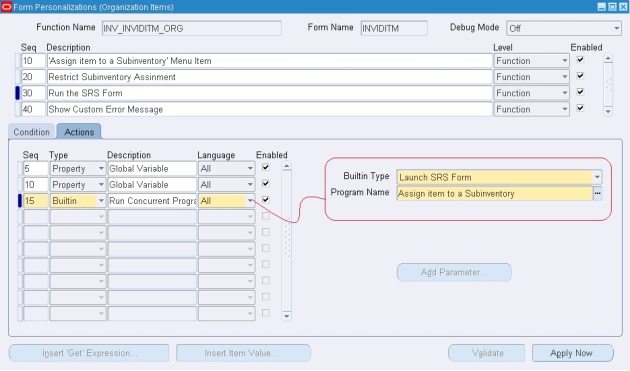
4] Select Type as ‘Builtin’ and Select Builtin Type as ‘Launch SRS Form’.

5] Select your Concurrent Program in the ‘Program Name’ tab. Please note that you need to assign the Function – ‘Requests: Submit’ to the Main Menu of the responsibility to which your concurrent program is attached.

  • Use: System Administrator > Security > Responsibility > Define to find the Menu Name.
  • Go to System Administrator > Application > Menu and add the Function – ‘Requests: Submit’ at the end and Save.
  • Also don’t forget to attach the concurrent program to proper Request Group.

6] Go to the concurrent program parameters. Select the Default Type as SQL Statement in the Validation tab and give the default values as

  • select :GLOBAL.G_ITEM_NAME from dual
  • select :GLOBAL.G_ORG_CODE from dual

7] Save and Test the functionality.

An Alternate Way:

Create a PL/SQL function in the database that calls fnd_request.submit_request and commits in an AUTONOMOUS TRANSACTION. The function returns a message to the user, with the request_id.

1] Go to Form Personalization for that Form (Use: Help > Diagnostics > Custom Code > Personalize)

2] Create one custom menu (ex. SPECIAL15) on the triggering event: WHEN-NEW-FORM-INSTANCE.

3] On the triggering event: SPECIAL15, do the following actions:

  • Define a global variable for the message (Ex. XX_CONC_PROG_RESULT)
  • Assign the above global variable the following value: =SELECT <Your Custom PL/SQL Function> from dual. You can pass parameters to the function as: Block_name.Field_name.
  • Define a message to show as =:GLOBAL.XX_CONC_PROG_RESULT

How to migrate Oracle Alerts?


1] Using FNDLOAD utility:

Here first DOWNLOAD the custom alert from the source instance, copy the ldt file to the new instance and then UPLOAD to the destination instance.

Command to download:

FNDLOAD apps_user_name/apps_password 0 Y DOWNLOAD $ALR_TOP/patch/115/import/alr.lct my_file.ldt ALR_ALERTS APPLICATION_SHORT_NAME=’XXCUST’ ALERT_NAME=<Alert name to download>

Here are some additional parameters that can also be passed are: 

ALR_DISTRIBUTION_LISTS
ALR_LOOKUPS
ALR_MESSAGE_SYSTEMS
ALR_ORACLE_MAIL_ACCOUNTS
ALR_PROFILE_OPTIONS
ALR_PERIODIC_SETS

Command to upload:

FNDLOAD apps_user_name/apps_password 0 Y UPLOAD  $ALR_TOP/patch/115/import/alr.lct my_file.ldt – CUSTOM_MODE=FORCE

2] Using Alert Manager Responsibility:

You can use the Transfer Alert Definitions window to transfer an alert definition to another database, or make a copy of an existing alert. 

1. From the Menu, choose Tools > Transfer Alert.

2. In the Source Alert block of the Transfer Alert Definition window, enter:

* Application name associated with the alert to be transferred

* Alert name to be transferred

* Username and password for the database where the Alert to transfer resides

Include any necessary SQL*Net syntax to indicate where your database resides.
SQL*Net syntax may be used. The different databases need to be defined in the
$TNS_ADMIN/tnsnames.ora file.

Example of: username/ password@ SQL*Net_syntax

sysadmin/friday@T:testing:db2

sysadmin/friday@db2

Note: Database Links are not supported in Applications

3. Similarly, in the Destination Alert block, enter:

* Application name for the new Alert.
* Alert name for the new Alert.
* Username and password for the new database location.

4. Click Transfer button to complete the alert transfer.

NOTE: This process works for NEW Alerts that do not exist. If the Alert exists already in the Destination location, you will receive the error:
APP-ALR-04016: The alert <alert_name> already exists on the destination database account.

Reference:

  • Oracle Alert User’s Guide
  • How to transfer alert definition from One Instance to another instance using cmdline script [ID 400295.1]

How to design Periodic Alert to send emails?


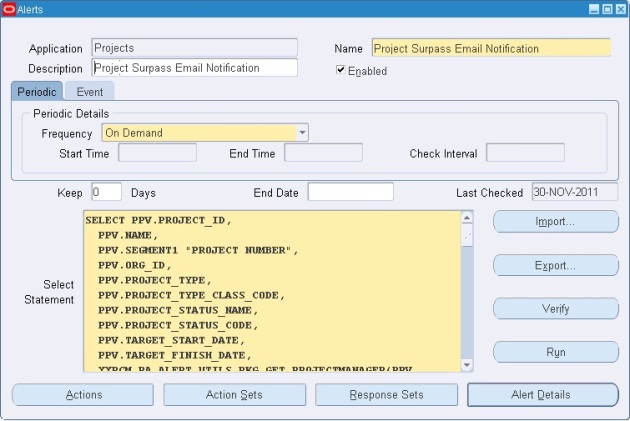
1] Go to ‘Alert Manager’ responsibility and navigate Alert > Define.

  • Enter the name of the application that will own the alert
  • Enter a suitable Name of the alert (up to 50 characters), and give it a meaningful description (up to 240 characters).
  • Select a frequency for your periodic alert. You can choose from nine frequency options:
  1. On Demand
  2. On Day of the Month
  3. On Day of the Week
  4. Every N Calendar Days
  5. Every Day
  6. Every Other Day
  7. Every N Business Days
  8. Every Business Day
  9. Every Other Business Day
  • Choose ‘On Demand’ frequency when you are developing a periodic alert so that you can test your alert at any time you want. When you will sure that the alert is working fine, then you can change the frequency as per business need.
  • Depending on the frequency you choose in the previous step, the Start Time and End Time fields become enabled.  You may also specify the number of times within a 24-hour period that Oracle Alert checks your alert.
  • Specify a value in the Keep _ Days field to indicate the number of days of exceptions, actions, and response actions history you want to keep for this alert.
  • Specify a value in the End Date field if you want to disable your alert by a certain date.
  • Enter a SQL Select statement that retrieves all the data your alert needs to perform the actions you plan to define.

Note:

  • Your periodic alert Select statement must include an INTO clause that contains one output for each column selected by your Select statement.
  • Identify any inputs with a colon before the name, for example, :INPUT_NAME.
  • Identify any outputs with an ampersand (&) before the name, for example, &OUTPUT_NAME.
  • Do not use set operators in your Select statement.
  • You can use PL/SQL functions in your Select statement to fetch complex business logic.

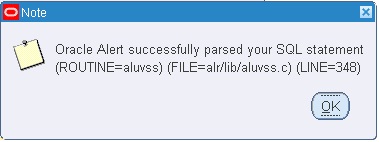
Click on the ‘Verify’ button to check the select statement is correct.

Click on the ‘Run’ button to execute the Select statement.

Once you are satisfied with the SQL statement, save your work.

2] You can view all the input and output column details in ‘Alert Details’ Tab. The Alert Details window includes information such as which Application installations you want the alert to run against, what default values you want your inputs variables to use, and what additional characteristics you want your output variables to have.

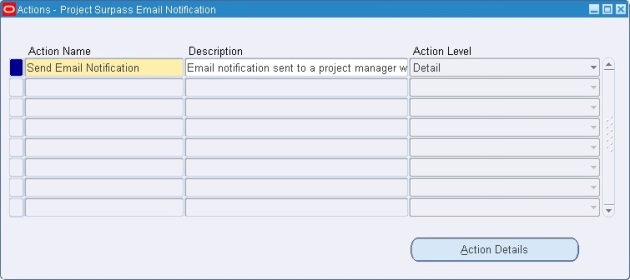
3] After you define your alert you need to create the actions you want your alert to perform. For that click on the ‘Actions’ tab.

  • Enter a name (up to 80 characters) and description (up to 240 characters) for your alert action.
  • Select a level for your action: Detail, Summary, or No Exception.
  1. Detail action: performs once for each individual exception found
  2. Summary action: performs once for all exceptions found
  3. No exception action: performs when no exceptions are found.

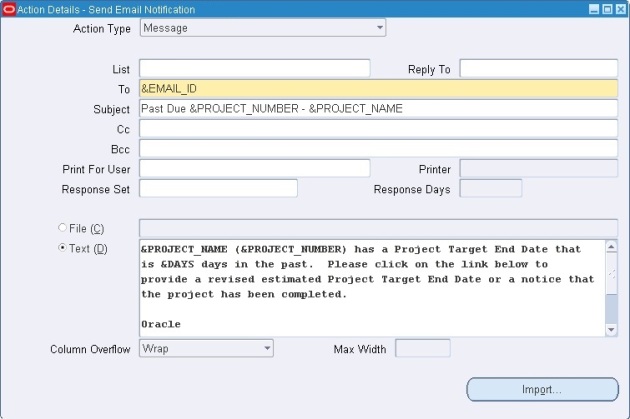
4] Click on ‘Action Details’ tab to display the Action Details window.

  • Select the Action Type field as ‘Message’ if you want to send emails. Other action types are: Concurrent Program, Operating System Script and SQL Script.
  • Specify the electronic mail IDs of the recipients you want to send your message to in the To field.
  • If you list more than one recipient in any of these recipient fields, separate each recipient by a space, or a comma, or a combination of the two.
  • You can enter as many recipients as you want, up to 240 characters.
  • You can also enter alert outputs or response variables in any of the alert detail fields. Oracle Alert automatically substitutes the associated output value when checking the alert or the associated response variable value when reading the response.
  • Save your changes.

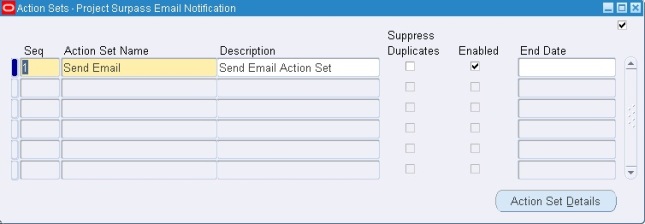
5] Click on ‘Action Sets’ tab in the main Alert Window.

  • Once you create your alert actions, you must include them in an enabled action set for Oracle Alert to perform during an alert check. An action set can include an unlimited number of actions and any combination of actions.
  • Enter a Sequence number that lets you order the execution of action sets during an alert check.
  • Give any suitable name and description.
  • Check Suppress Duplicates if you want Oracle Alert to suppress the actions in this action set if the exception found is a duplicate that occurred during the last alert check.

6] Click on ‘Action Set Details’ tab.

  • Go to ‘Members’ tab.
  • Find and attach the action that is created in Step 3.
  • Save the changes. 

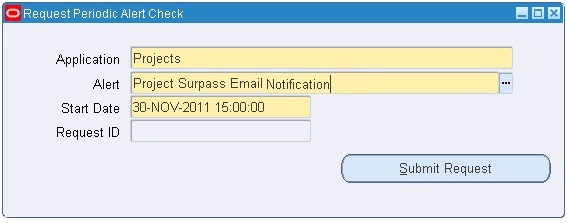
7] Since it is an ‘On Demand’ periodic alert, we can run the alert at any time we want. For that go to Request > Check and enter the alert details. Then click on ‘Submit Request’.

  • This will fire one concurrent program which you can view by going through the navigation:  Request > View
  • View the Log and Output files of the concurrent program to find that the alert is fired successfully.

Done…check your mailbox and you should get emails that are sent from Oracle Alerts.

Utility APIs for Concurrent Processing


FND_CONCURRENT.GET_REQUEST_STATUS

This API Returns the Status of a concurrent request. It also returns the completion text if the request is already completed. The return type is Boolean (Returns TRUE on successful retrieval of the information, FALSE otherwise).

  function get_request_status(request_id     IN OUT NOCOPY number,
		              appl_shortname IN varchar2 default NULL,
		              program        IN varchar2 default NULL,
		              phase      OUT NOCOPY varchar2,
		              status     OUT NOCOPY varchar2,
		              dev_phase  OUT NOCOPY varchar2,
		              dev_status OUT NOCOPY varchar2,
		              message    OUT NOCOPY varchar2) return boolean;

The parameters are:

  • REQUEST_ID: Request ID of the program to be checked.
  • APPL_SHORTNAME: Short name of the application associated with the program. The default is NULL.
  • PROGRAM: Short name of the concurrent program. The default is NULL.
  • PHASE: Request phase.
  • STATUS: Request status.
  • DEV_PHASE: Request phase as a string constant.
  • DEV_STATUS: Request status as a string constant.
  • MESSAGE: Request completion message.

FND_CONCURRENT.WAIT_FOR_REQUEST

This API waits for the request completion, then returns the request phase/status and completion message to the caller. It goes to sleep between checks for the request completion. The return type is Boolean (Returns TRUE on successful retrieval of the information, FALSE otherwise).

  function wait_for_request(request_id IN number default NULL,
		  interval   IN  number default 60,
		  max_wait   IN  number default 0,
		  phase      OUT NOCOPY varchar2,
		  status     OUT NOCOPY varchar2,
		  dev_phase  OUT NOCOPY varchar2,
		  dev_status OUT NOCOPY varchar2,
		  message    OUT NOCOPY varchar2) return  boolean;

The parameters are:

  • REQUEST_ID: Request ID of the request to wait on. The default is NULL.
  • INTERVAL: Number of seconds to wait between checks. The default is 60 seconds.
  • MAX_WAIT: Maximum number of seconds to wait for the request completion. The default is 00 seconds.
  • PHASE: User-friendly Request phase.
  • STATUS: User-friendly Request status.
  • DEV_PHASE: Request phase as a constant string.
  • DEV_STATUS: Request status as a constant string.
  • MESSAGE: Request completion message.
There are few other useful apis too.
  • FND_CONCURRENT.SET_COMPLETION_STATUS: Called from a concurrent request to set its completion status and message.
  • FND_CONCURRENT.GET_REQUEST_PRINT_OPTIONS: Returns the print options for a concurrent request.
  • FND_CONCURRENT.GET_SUB_REQUESTS: Get all sub-requests for a given request id. For each sub-request it provides request_id, phase,status, developer phase , developer status and completion text.
  • FND_CONCURRENT.Cancel_Request: It cancels a given Concurrent Request.

How to call a Concurrent Program from a Special Menu Item?


Well, we can run our concurrent programs from a Special Menu Item, and if you have a requirement of this sort, you can use the steps below to use Form Personalization Builtin to achieve this task in couple of minutes.

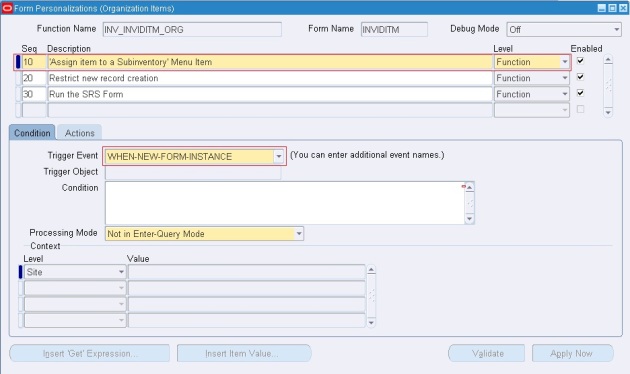
1] First create the Special Menu Item wherever required through Form Personalization. Here I have added a Special Menu Item called ‘Assign Item to a Subinventory’ to the Form-‘INVIDITM’. For that assign the Trigger Event as ‘WHEN-NEW-FORM-INSTANCE’.

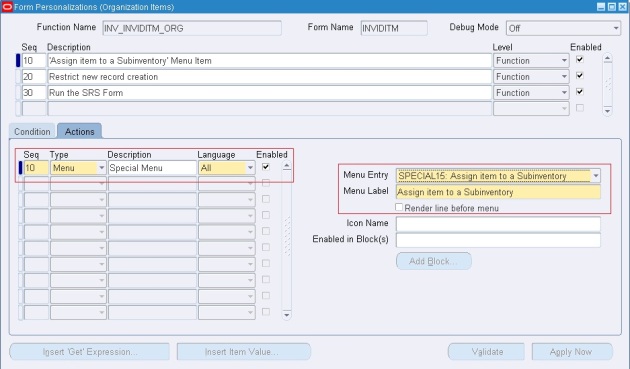
2] In Actions Tab, choose the type as ‘MENU’ and select the Menu Entry and give a Proper Menu Label.

3] Create the Concurrent Program which you want to attach to this custom menu item. Once created, assign the program to the Request Group of the Responsibility. Also it is required to add the ‘Lunch SRS Form’ Function (Requests: Submit) to the main menu of that responsibility. If you don’t do this step you may get Form Personalization error in later steps.

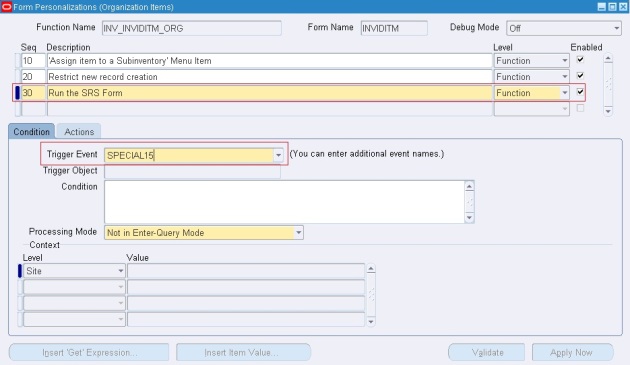
4] Create one more entry in Form Personalization window with Trigger Event as your custom menu item.

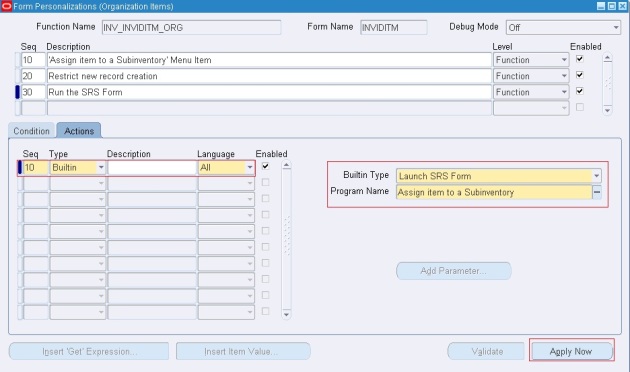
5] Here select the Actions Type as ‘Builtin’ and Builtin Type as ‘Lunch SRS Form’. In the program name give the name of your concurrent program.

6] Validate and Apply Now

Once done, you will be able to view the custom menu item in the Form and when you will click it, it opens the SRS Form with your concurrent program.